Limit Cronofy's access by Role-Based Access Control (RBAC), without tenant-wide permissions BETA
Read as MarkdownThis connection path lets you authorize Cronofy without granting a tenant-wide application permission, using Role-Based Access Control (RBAC).
Before you start #
- You must sign in as a Global Administrator of the Microsoft 365 tenant. The flow rejects any other account with the message “You must be signed in as a Global Administrator of the Microsoft 365 tenant to connect via RBAC”.
- You will need access to Exchange Online PowerShell to create the role assignment.
- RBAC connect is not compatible with the Free/Busy Calendar Access Mode. Free/Busy connections use delegated permissions, which an application role assignment does not restrict.
Step 1: Complete the connection #
Follow the link your software provider gives you and sign in with your Global Administrator account.
At this point Cronofy has a connection for your tenant but no access to any calendar until you complete Step 2.
Step 2: Assign Cronofy a scoped calendar role in Exchange Online #
The purpose of configuring Role Based Access Control is to limit the Calendars.ReadWrite scope of the Cronofy Entra application to a specific set of users.
The process of setting up Role Based Access Control will involve the following steps:
- Creating a Service Principal - This is a representation of the Entra application within your tenant that you wish to limit the access of.
- Creating a Management Scope - This is used to define the set of users you wish to limit the application to based on the properties of these objects.
- Creating a Management Role Assignment - This ties together a principal, role, and custom resource scope of access. This assignment acts as the permissions assignment for a service principal performing a role across a scope.
You can set up Role Based Access Control and limit the scope of Cronofy’s application permissions by following the below steps:
Connect to Exchange Online PowerShell. For details, see Connect to Exchange Online PowerShell
Look up the Cronofy application’s Object ID. The Application ID is a fixed value issued by Cronofy,
10bb7e5b-b80b-4e6e-a209-f78581dbc79e. The Object ID is specific to your tenant; find it on the application’s page in the Entra Enterprise applications portal:- Open Enterprise applications and search for the Application ID
10bb7e5b-b80b-4e6e-a209-f78581dbc79e. - Open the matching application and copy its Object ID. You pass this value to
New-ServicePrincipalin the next step.
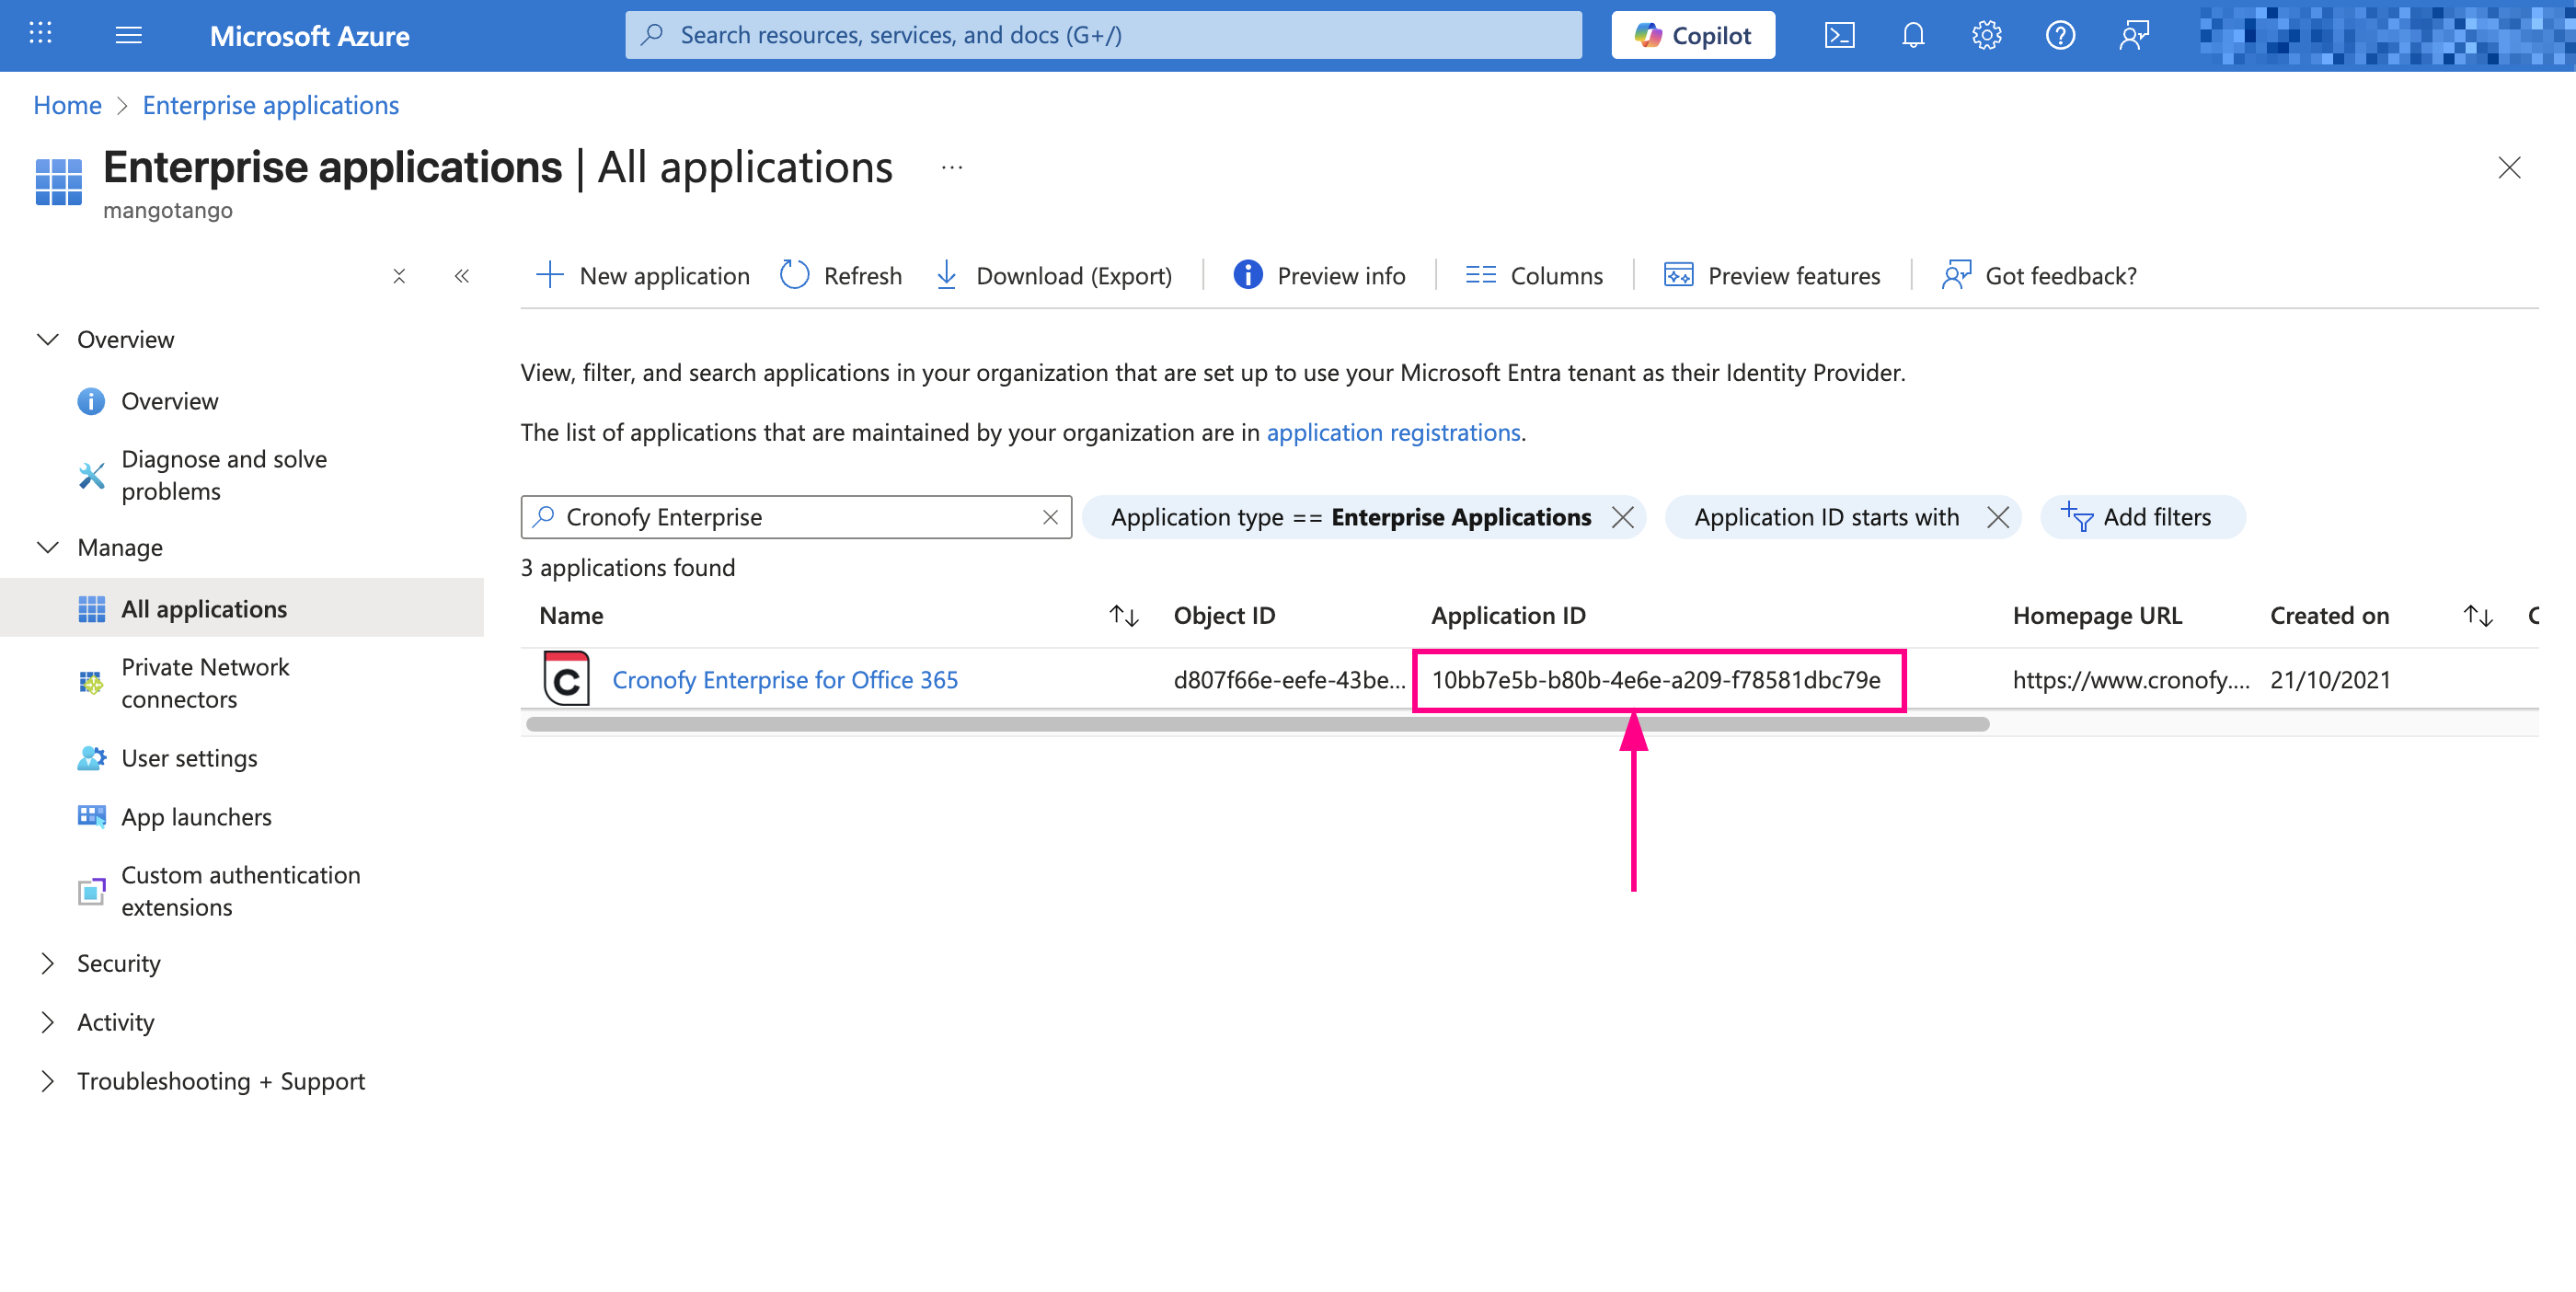
- Open Enterprise applications and search for the Application ID
Create the service principal in Exchange, passing the Application ID and the Object ID from the previous step, and a DisplayName of your choosing:
New-ServicePrincipal -AppId 10bb7e5b-b80b-4e6e-a209-f78581dbc79e -ObjectId <Object Id from Step 2> -DisplayName "Cronofy Calendar Sync"Create a mail-enabled security group whose members are the mailboxes you want Cronofy to access, or use an existing one.
4.1 Create the group if you do not already have one. From the Exchange Online PowerShell session, create a mail-enabled security group and add the user and resource mailboxes you want Cronofy to be able to reach as its members:
New-DistributionGroup -Name "Application Security Group" -Type Security
Add-DistributionGroupMember -Identity "Application Security Group" -Member "user@example.com"
The mailboxes in this group are exactly the set Cronofy will have access to, so add users and resources here as your requirements change.
4.2 You will need the DistinguishedName of the security group in order to create the new Management Scope in the following step. You can get this by running the following command, replacing the argument for Identity:
Get-DistributionGroup -Identity "Application Security Group" | Format-List DistinguishedName4.3 Once you have the DistinguishedName you can then create a new Management Scope by running the following command, replacing the argument for Name and MemberOfGroup:
New-ManagementScope -Name "ApplicationCalendarScope" -RecipientRestrictionFilter {MemberOfGroup -eq 'DISTINGUISHEDNAME'}
Create a New Management Role Assignment for the role ‘Application Calendars.ReadWrite’ associated with the previously created Resource Scope, replacing the argument for CustomResourceScope:
New-ManagementRoleAssignment -App 10bb7e5b-b80b-4e6e-a209-f78581dbc79e -Role "Application Calendars.ReadWrite" -CustomResourceScope "ApplicationCalendarScope"You can test the authorisation to see whether specific users show as being part of the scope you have just defined by running the below command, replacing the argument for Resource:
Test-ServicePrincipalAuthorization -Identity 10bb7e5b-b80b-4e6e-a209-f78581dbc79e -Resource "EMAIL ADDRESS"The result will include the parameter
InScopewhich will return either True or False, where True indicates Cronofy has access to their calendar data.
Microsoft caching #
Exchange Online does not re-evaluate the role assignment on every request; it caches whether the Cronofy application may reach a given mailbox. The cache can persist anywhere between 30 minutes to 2 hours. Microsoft documents this limitation here:
- Adding a mailbox to the scope takes time to take effect. After you add a user or resource mailbox to the security group behind your management scope, there is a delay before Cronofy can read it. During that window it will not sync even though the assignment is correct.
- Removing a mailbox from the scope also takes time. Cronofy’s access to a mailbox can persist briefly after you remove it from the scope, until the cached decision expires.
A Test-ServicePrincipalAuthorization result of InScope : True for a mailbox that still will not sync usually means Microsoft’s cache has not yet caught up; allow time and check again before treating it as a fault.