Calendar Access Modes
Table of contents #
What are Calendar Access Modes? #
When connecting customers to your application, there are two relationships at play with how customers can connect.
- How the Customer Connects to Cronofy
- How Cronofy Connects that information to your application.
The connection between your application and Cronofy has been handled via our scopes. These tell us how you want Cronofy to interact with customers on behalf of your application. However, customers may want more control on how they want Cronofy to access them and their calendars.
This can be handled via the calendar provider policies and permissions, or alternatively, you can rely on Cronofy Access Mode options to handle this.
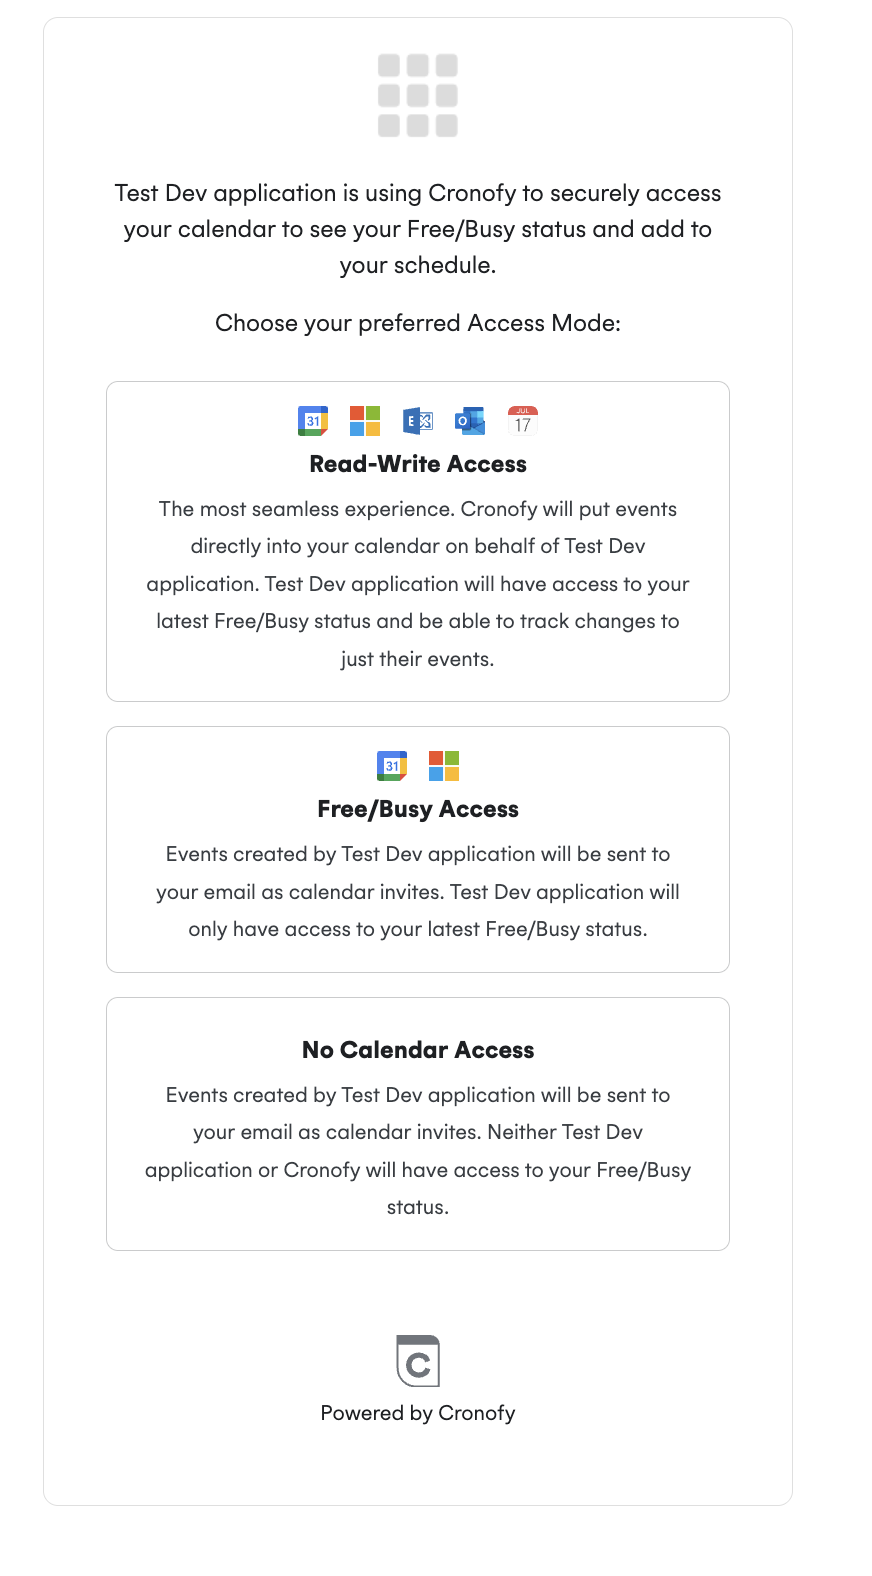
Calendar Access Modes allow customers to choose a different permission model for how Cronofy connects to their calendars in one of three modes.

Read-Write
The most seamless experience, where events are put directly in users calendars. This has long been the default mode.
Free/Busy Access
Those with more privacy requirements can choose Free/Busy mode to prevent Cronofy from syncing event details. Events are written via the same APIs, but instead of writing directly into the users calendar, they receive email invites to events.
No Access Mode
This access mode is for those who cannot connect a calendar in any form to Cronofy. They can use No Access Mode to receive invites by email at the cost of having to manage their Availability manually. This mode is also good for giving a demo of your application without connecting a calendar to Cronofy.
Should you wish to offer your customers the ability to select different access modes, they will be given the options during the Oauth flow when you request authorization for the end users account either via Individual Connect or Enterprise Connect.
Each of these modes offers a different level of access your application can have to a user’s calendar. Below you will see a brief description of what each access mode offers.
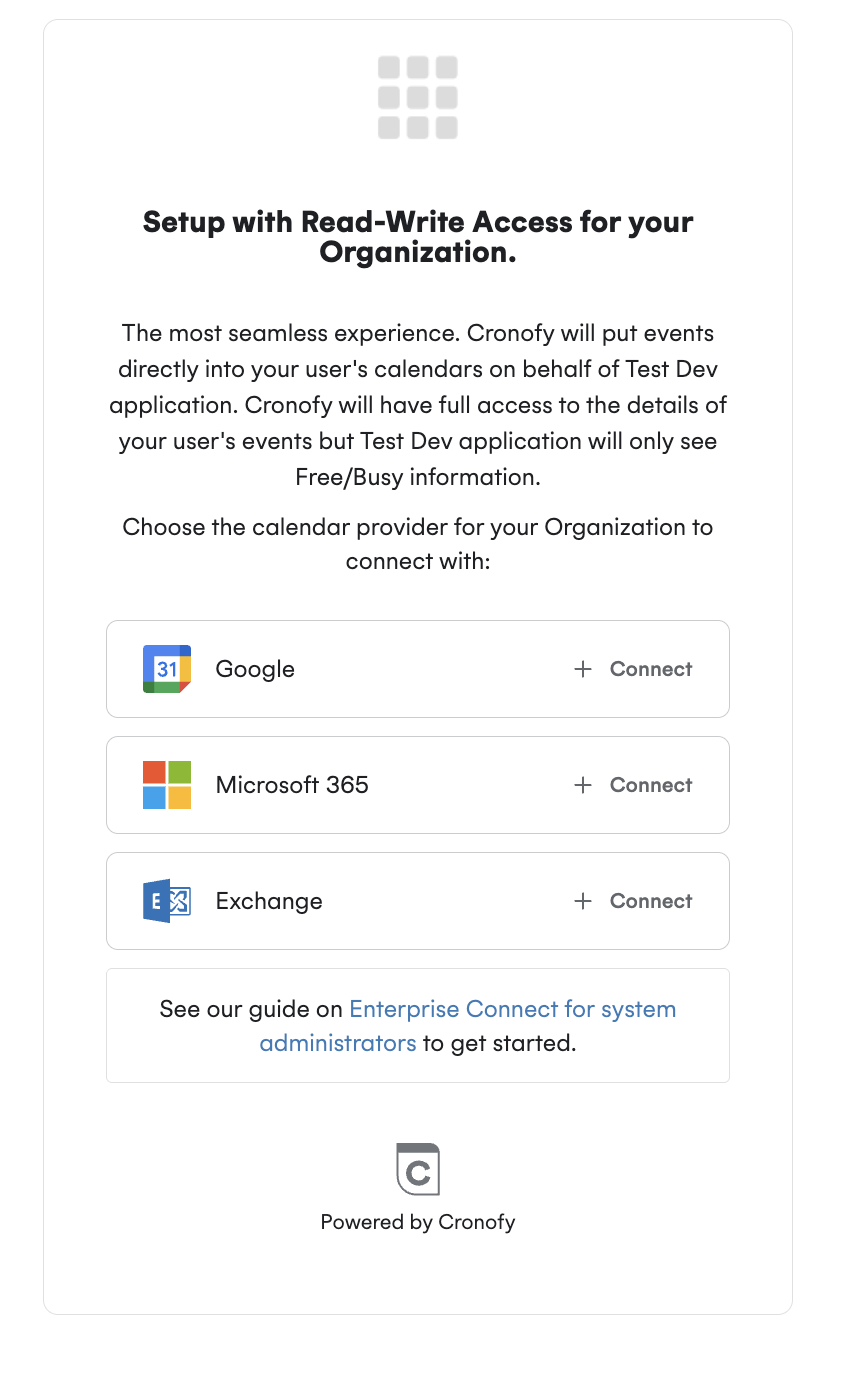
Read-Write Access #
Learn how to set up Read-Write access
Required Scope: free_busy_write
The Read-Write access mode gives your application the ability to create events directly in the user’s calendar as well as the ability to update and delete the events that your application creates. Availability based on the end users calendar is kept up to date, so you can find free times using our powerful Availability APIs. When requesting information about the customers calendar you will be able to utilise:
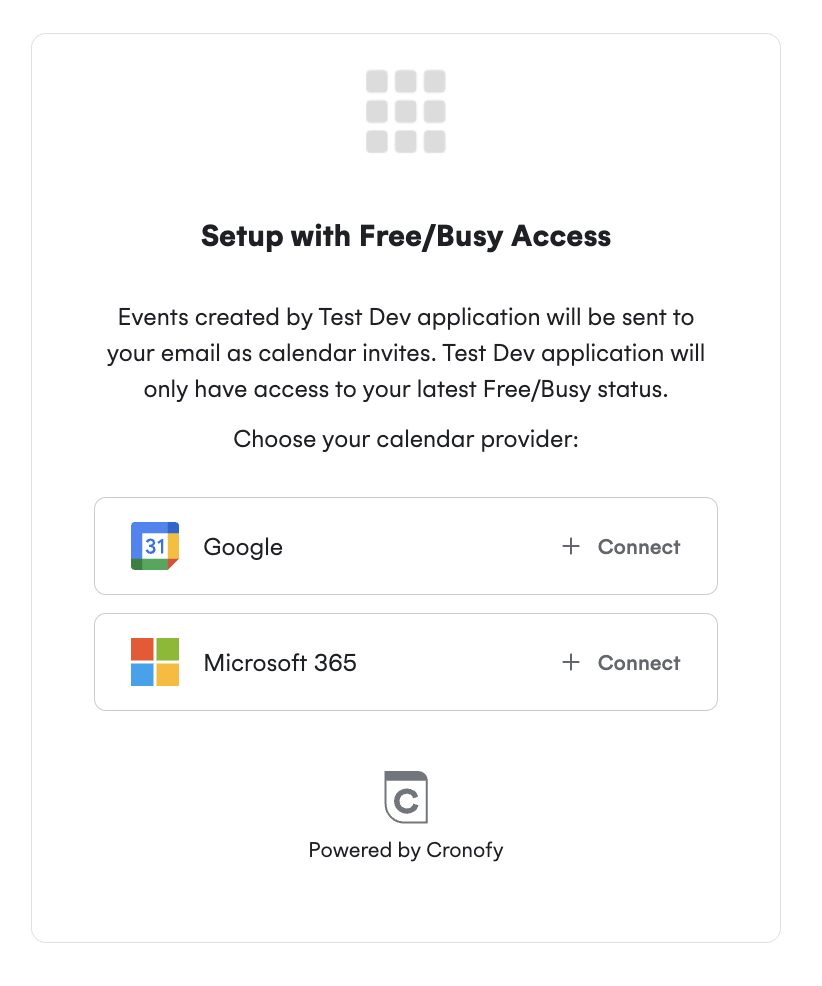
Free/Busy Access #
Learn How to Set up Free/Busy access
Required Scope: free_busy_write
Required Feature: Enable Free/Busy
Free/Busy access mode removes visibility to the details of events, while retaining the full Availability information from a user’s calendar when using the Availability APIs. When requesting information about the customer’s calendar you will be able to utilise:
Events can still be created through Cronofy, but instead of being written directly into their calendar, event invites are sent to the customer’s inbox which they can accept. Updates to these created events will also be sent to the user’s inbox.
This mode is perfect for those wanting to balance their application’s ability to create and edit events in the user’s calendar with a need for privacy - ensuring the details of events do not leave the calendar provider.
To achieve this you would need to specify the free_busy_write scope when requesting authorization and to enable the “Free/Busy” feature in the Developer Dashboard.
No Calendar Access #
Learn How to Set up No Calendar access
Required Scope: free_busy_write
Required Feature: Enable No Access
For customers who have more stringent security or compliance requirements, the No Calendar Access mode can help. This mode gives you access to our powerful APIs without needing any access to the user’s calendar.
Events are sent as email invites for the user to add to their main calendar. This is achieved by creating a Cronofy calendar for the user on their Cronofy Account that maintains all the information of events you have created without needing direct access to the users personal calendar.
When requesting information about the customers calendar you will be able to utilise:
This can be used to avoid double booking - for example, when creating interviews for multiple candidates, each existing event will prevent other candidates from selecting the same time.
To achieve this you would need to specify the free_busy_write scope when requesting authorization and to enable the “No Calendar Access” feature in the Developer Dashboard.
How can my app use Calendar Access Modes? #
Calendar Access Modes are not difficult to offer as options for your end users. You will not need to call a different authorization endpoint to request access, nor will you need to use different APIs to get the information on users calendars you need.
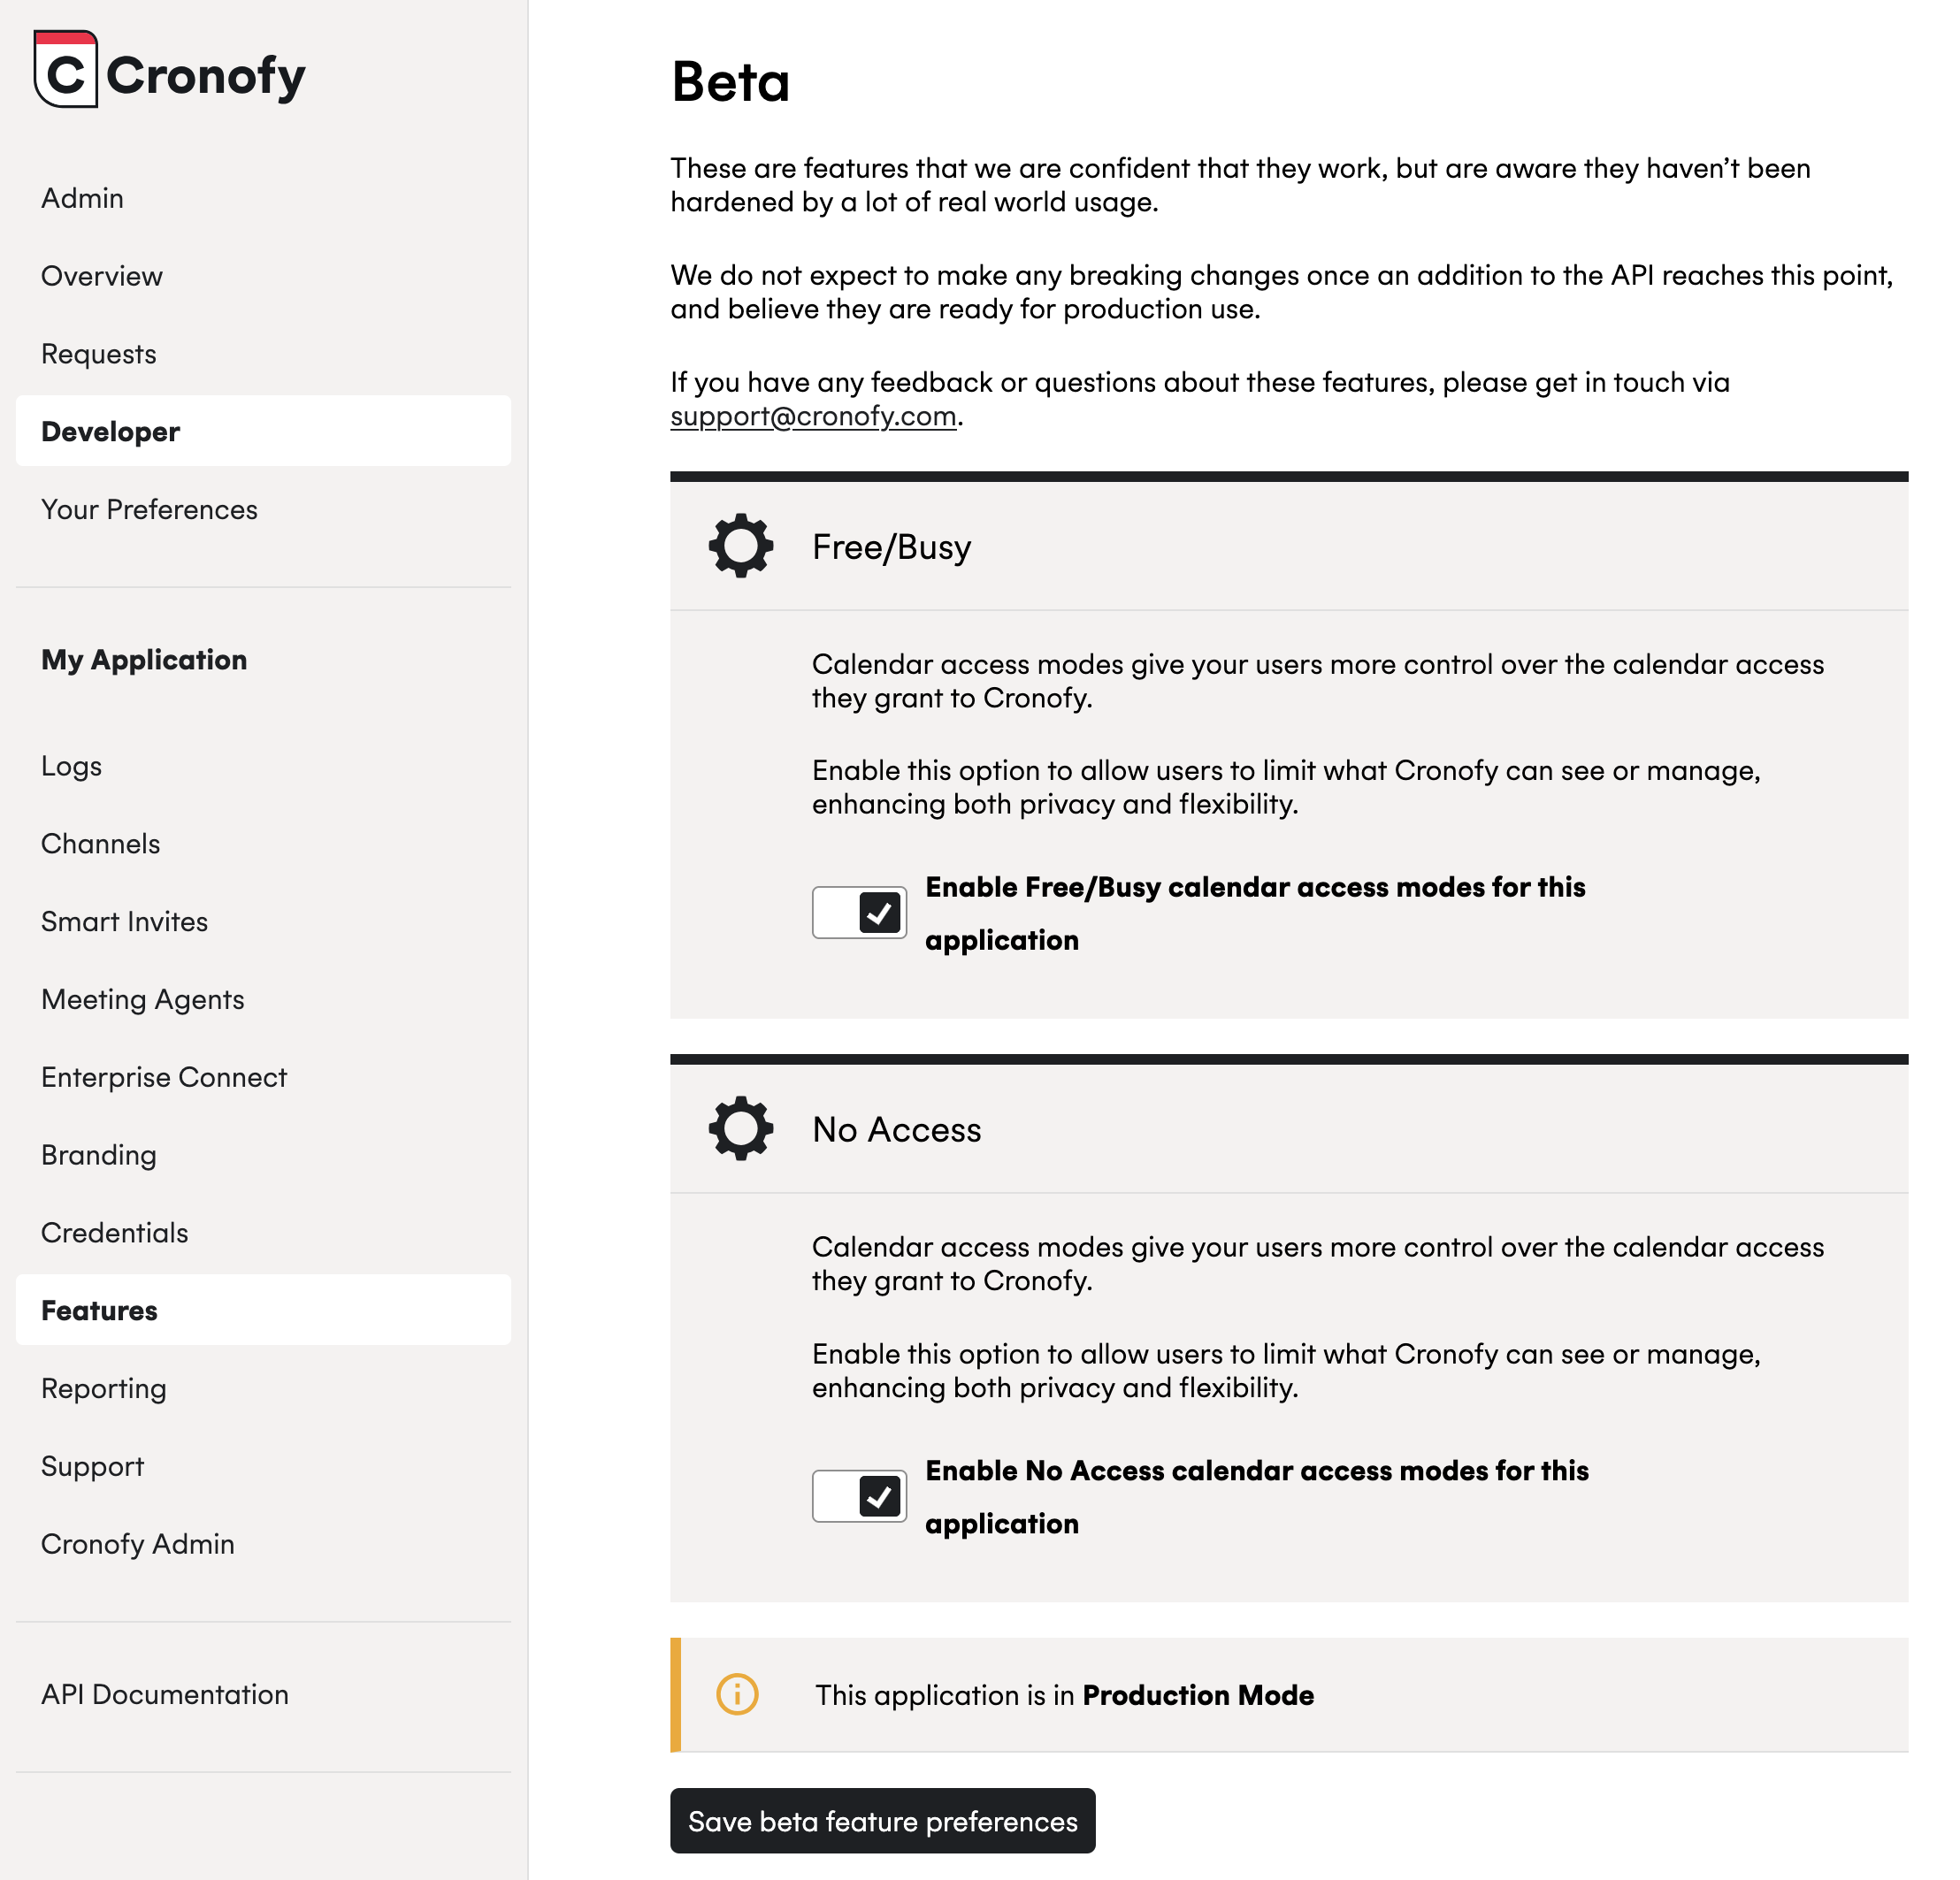
Enable the feature #
Visit the Features section for your application in the Cronofy developer dashboard to toggle on the options to offer Free/Busy and No Calendar Access to your customers:
What if I want to choose the Access Mode or Calendar Provider for my customer? #
You can create a deeplink URL which you can provide to your users to pre-select:
- an Access Mode, or
- both an Access Mode and a Calendar Provider
You can see how to create deeplinks for both of these options below:
Pre-selecting a Calendar Access Mode #
This will direct them to the provider options for the Access Mode you have selected rather than allowing them to select the Access Mode to authorize against.
To pre-select an Access Mode, you need follow the relevant authorization flow but pass the optional request parameter access_mode. You can pass the below options to this parameter:
read_writefree_busyno_calendar
Required Scope: free_busy_write
Individual Connect
    https://app.cronofy.com/oauth/authorize?response_type=code
      &client_id={CLIENT_ID}
      &redirect_uri={REDIRECT_URI}
      &scope=free_busy_write
      &state={STATE}
      &access_mode=free_busy
Enterprise Connect
    https://app.cronofy.com/enterprise_connect/oauth/authorize
    ?response_type=code
    &client_id={CLIENT_ID}
    &redirect_uri={REDIRECT_URI}
    &scope=service_account/accounts/manage
    &delegated_scope=free_busy_write
    &state={STATE}
    &access_mode=read_write
When accessing these links, the users would be presented with the below:
Pre-selecting the Access Mode and Calendar Provider #
This will direct them to the Calendar Provider for the Access Mode you have selected rather than allowing them to select the Calendar Provider to authorize against.
To pre-select a Calendar Provider, you need follow the relevant authorization flow but pass the optional request parameters access_mode and provider_name. You can pass the below options to each parameter:
access_mode:
read_writefree_busy
provider_name:
googlems_graph
Required Scope: free_busy_write
Individual Connect
    https://app.cronofy.com/oauth/authorize?response_type=code
      &client_id={CLIENT_ID}
      &redirect_uri={REDIRECT_URI}
      &scope=free_busy_write
      &state={STATE}
      &access_mode=free_busy
      &provider_name=google
Enterprise Connect
    https://app.cronofy.com/enterprise_connect/oauth/authorize
    ?response_type=code
    &client_id={CLIENT_ID}
    &redirect_uri={REDIRECT_URI}
    &scope=service_account/accounts/manage
    &delegated_scope=free_busy_write
    &state={STATE}
    &access_mode=free_busy
    &provider_name=google
When accessing these links, the users would be presented with the below:


A few caveats
For Enterprise Connect, please ensure not to confuse access_mode and delegated_scope.
access_mode determines the level of access Cronofy will have to connected calendars.
delegated_scope determines the level of access your application will have against connected calendars.
There are other providers that can be used also, see here for a full list, but they can only be used with the read_write access mode.
In This Section
- Read-Write Access How to work with customers who want to use Read-Write access
- Custom Emails For Event Invites How to setup a custom email for Free/Busy or No Access Mode event invites
- Free/Busy Access How to work with customers who only want to connect a calendar by Free/Busy access
- No Calendar Access How to work with customers who do not want to connect a calendar
- Calendar Access Modes FAQs Frequently asked questions about working with Calendar Access Modes