Individual Connect
Read as Markdown Required plan: EmergingCronofy sits as an intermediary layer between your White-Label API application and your users’ calendars. This means that your application is actually authorizing with Cronofy rather than directly with the calendar services. We handle the different calendar service authorization processes so you don’t have to.
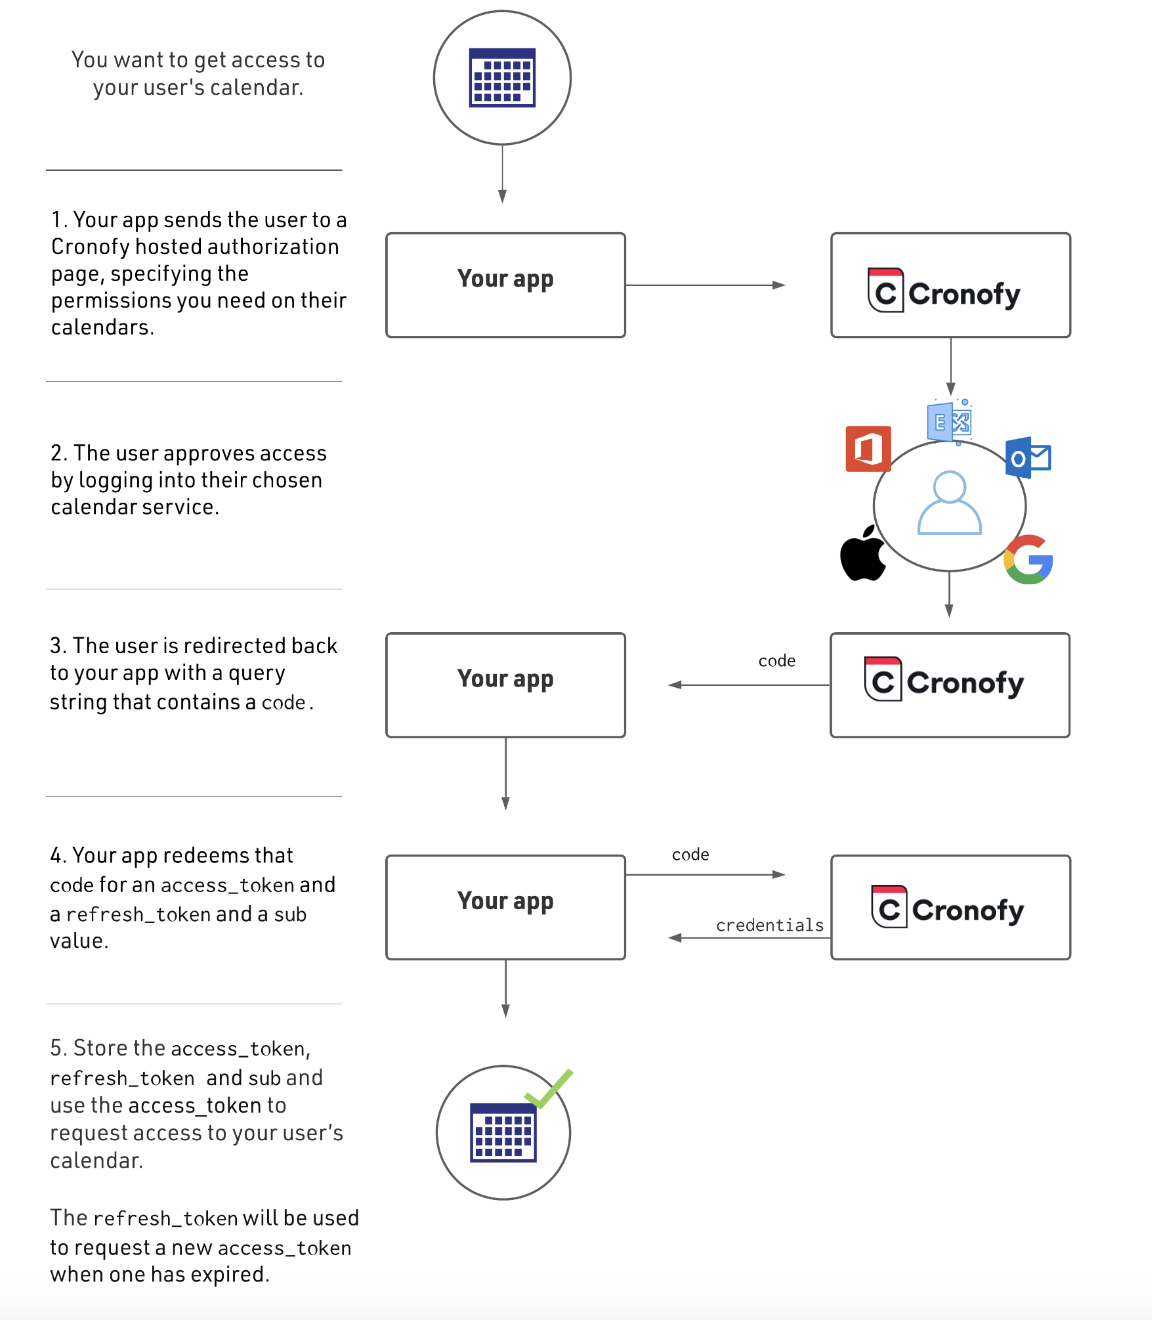
In order to do this we utilize the same OAuth2 security protocol that Google use. The flow goes like this:
Now to walk you through setting up this flow.
Identifying Your Application #
The first step is to identify your application to Cronofy. This will give you the CLIENT_ID and CLIENT_SECRET required by the process.
Login to the Developer Dashboard and choose Create application at the foot of the page.
This will give you the CLIENT_ID and CLIENT_SECRET you need.
You’ll note that there is a warning that This application is not verified. We’ll explain this later on this guide but for the moment it’s just a warning and is not going to prevent you from getting up and running.
Gaining Your User’s Approval #
Now we’ve got the identifiers needed for the application we can now setup the redirect flow. The URL to send your users to is constructed as follows.
https://app.cronofy.com/oauth/authorize?response_type=code
  &client_id={CLIENT_ID}
  &redirect_uri={REDIRECT_URI}
  &scope={SCOPE}
  &state={STATE}
CLIENT_IDis the one associated with your app created aboveREDIRECT_URIthe URL we should redirect the user to once they’ve completed the authorizationSCOPEis the space separated (%20 on a URL string) list of permissions you’re requesting. Full docs here: Request Authorization DocsSTATEthis is returned, unaltered, on the query string when the user is redirected back to your app.
Getting the Access Token #
When the user is redirected back to your application the query string will contain a code parameter. This is a one time use code used to retrieve the access_token and refresh_token for the user.
If you’re using a library for managing the OAuth flow then it is likely that it will handle this step for you as we’ve followed a series of conventions for the various token management endpoints. For example
- omniauth for ruby automatically retrieves the tokens as part of populating it’s credential hash.
- DotNetOpenAuth as the RequestUserAuthorization on the WebServerClient for retrieving the tokens
- OAuth2 Client for PHP provides $provider->getAccessToken() for this purpose.
If you need to retrieve the code yourself, then the Request Access Token docs will give you what you need.
Using the Access Token #
The final step is to use the access_token to interact with the user’s calendars.
It is passed in an Authorization header in all HTTP requests to the API.
GET /v1/calendars HTTP/1.1
Host: {data_center_url}
Authorization: Bearer {ACCESS_TOKEN}
More information in the Authorization section of our API docs.
Verifying Your Application #
Calendar data is sensitive data so we need to do what we can to ensure that we’re only passing codes back to your application.
We do this by only allowing verified applications to request authorization using pre-configured redirect_url values.
Once your app is ready for production then let us know the URL(s) you’ll be redirecting the users to after they’ve authorized by emailing support@cronofy.com and we can get your application verified.
Dealing With A Token Expiry #
One more thing to consider is handling token expiry. You will need to deal with it some point as access_tokens are designed to expire periodically.
This is the purpose of the refresh_token return alongside the access_token. If you store that against your user record as well then you can use it to request a new access_token at any time.
Again OAuth2 libraries generally have support for this flow.