Calendars & Events
Read as MarkdownIn this guide we’ll get you started as quickly as possible with the Cronofy Calendar API. This will cover:
- Getting authorization to access a calendar
- Reading events
- Creating your first event
Authorization #
The very first thing to do is obtain authorization to access a user’s calendars. Cronofy acts as an intermediary between your application and the various calendar services in use.
We act as an OAuth2 provider to your application so the API access is via a user specific access_token.
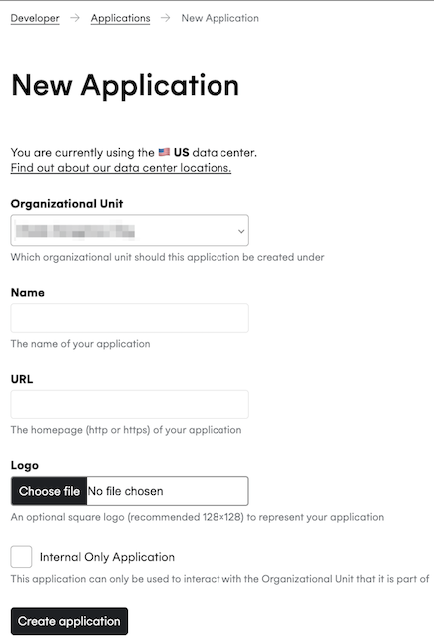
Once you’ve signed up for a Developer Account, you can create an Application.
With your Application created, you will be able to connect your calendar by following the OAuth journey.

Once you’ve connected your calendar, you will be able to view your access_token and you are ready to start making API calls.
Reading Events #
The Cronofy API allows you to read all events across all calendars for all providers with one call. The only mandatory parameter is the tzid, ie. time zone identifier, for which you want to read.
The example below is for UTC, but you can also use Europe/Paris, America/Chicago or any identifier in the IANA Time Zone Database.
curl -v -G --header "Authorization: Bearer {YOUR_ACCESS_TOKEN_HERE}" \
  -d 'tzid=Etc/UTC' https://api.cronofy.com/v1/events
cronofy = Cronofy::Client.new(access_token: '{YOUR_ACCESS_TOKEN_HERE}')
events = cronofy.read_eventsvar cronofy = new CronofyAccountClient("{YOUR_ACCESS_TOKEN_HERE}");
var events = cronofy.GetEvents();var options = {
access_token: '{YOUR_ACCESS_TOKEN_HERE}',
tzid: 'Etc/UTC'
};
cronofy.readEvents(options)
.then(function (response) {
var events = response.events;
});$cronofy = new Cronofy('', '', '{YOUR_ACCESS_TOKEN_HERE}', '');
$events = $cronofy->read_events(array('tzid' => 'Etc/UTC'));import pycronofy
cronofy = pycronofy.Client(access_token="{YOUR_ACCESS_TOKEN_HERE}")
events = cronofy.read_events()This will return JSON formatted results similar to this:
{
  "events": [
    {
      "calendar_id": "cal_U9uuErStTG@EAAAB_IsAsykA2DBTWqQTf-f0kJw",
      "event_uid": "evt_external_54008b1a4a41730f8d5c6037",
      "summary": "Company Retreat",
      "description": "",
      "start": "2026-07-31",
      "end": "2026-07-31",
      "deleted": false,
      "location": {
        "description": "Beach"
      },
      "participation_status": "needs_action",
      "transparency": "opaque",
      "event_status": "confirmed",
      "categories": [],
      "attendees": [
        {
          "email": "example@cronofy.com",
          "display_name": "Example Person",
          "status": "needs_action"
        }
      ],
      "created": "2026-07-27T08:00:01Z",
      "updated": "2026-07-27T09:24:16Z"
    }
  ]
}
You’ll see that the response is also setup for paging, so if there is more than one page you can request the next one by using the url supplied in pages.next_page.
By default the events returned are from 42 days in the past to 201 days in the future. You can specify from and to parameters to refine that search.
For example, the following will return events between, and including, 2026-07-27 and 2026-08-01.
curl -v -G --header "Authorization: Bearer {YOUR_ACCESS_TOKEN_HERE}" \
  -d 'tzid=Etc/UTC&from=2026-07-27&to=2026-08-01' https://api.cronofy.com/v1/events
cronofy = Cronofy::Client.new(access_token: '{YOUR_ACCESS_TOKEN_HERE}')
events = cronofy.read_events(from: Date.new(2026, 7, 27), to: Date.new(2026, 8, 1))var cronofy = new CronofyAccountClient("{YOUR_ACCESS_TOKEN_HERE}");
var builder = new GetEventsRequestBuilder()
.From(2026, 7, 27)
.To(2026, 8, 1);
var events = client.GetEvents(builder);var options = {
access_token: '{YOUR_ACCESS_TOKEN_HERE}',
tzid: 'Etc/UTC',
from: '2026-07-27',
to: '2026-08-01'
};
cronofy.readEvents(options)
.then(function (response) {
var events = response.events;
});$cronofy = new Cronofy('', '', '{YOUR_ACCESS_TOKEN_HERE}', '');
$params = array(
'tzid' => 'Etc/UTC',
'from' => '2026-07-27',
'to' => '2026-08-01'
);
$events = $cronofy->read_events($params);import pycronofy
cronofy = pycronofy.Client(access_token="{YOUR_ACCESS_TOKEN_HERE}")
events = cronofy.read_events(
from_date='2026-07-27',
to_date='2026-08-01',
tzid='Etc/UTC')For more details see Read Events.
Creating a Calendar Event #
The first step is to get the calendar_id for the calendar you want to insert the event into.
curl -v --header "Authorization: Bearer {YOUR_ACCESS_TOKEN_HERE}" \
    https://api.cronofy.com/v1/calendars
cronofy = Cronofy::Client.new(access_token: '{YOUR_ACCESS_TOKEN_HERE}')
calendars = cronofy.list_calendarsvar cronofy = new CronofyAccountClient("{YOUR_ACCESS_TOKEN_HERE}");
var calendars = cronofy.GetCalendars();cronofy.listCalendars({ access_token: '{YOUR_ACCESS_TOKEN_HERE}'})
.then(function (response) {
var calendars = response.calendars;
});$cronofy = new Cronofy('', '', '{YOUR_ACCESS_TOKEN_HERE}', '');
$calendars = $cronofy->list_calendars();import pycronofy
cronofy = pycronofy.Client(access_token="{YOUR_ACCESS_TOKEN_HERE}")
calendars = cronofy.list_calendars()This will give you a response similar to this:
{
  "calendars": [
    {
      "provider_name": "google",
      "profile_id": "pro_n23kjnwrw2",
      "profile_name": "example@cronofy.com",
      "calendar_id": "cal_n23kjnwrw2_jsdfjksn234",
      "calendar_name": "Home",
      "calendar_readonly": false,
      "calendar_deleted": false
    },
    {
      "provider_name": "apple",
      "profile_id": "pro_n23kjnwrw2",
      "profile_name": "example@cronofy.com",
      "calendar_id": "cal_n23kjnwrw2_3nkj23wejk1",
      "calendar_name": "Bank Holidays",
      "calendar_readonly": true,
      "calendar_deleted": false
    }
  ]
}
The calendar_id is the internal Cronofy identifier for the calendar. You can then create an event by posting a JSON formatted payload.
Lets say you want to create the follow event in a specific calendar:
{
  "event_id": "qTtZdczOccgaPncGJaCiLg",
  "summary": "Board meeting",
  "description": "Discuss plans for the next quarter.",
  "start": "2026-07-27T15:30:00Z",
  "end": "2026-07-27T17:00:00Z",
  "location": {
    "description": "Board room"
  }
}
Then you would post the following:
curl -v --header "Authorization: Bearer {YOUR_ACCESS_TOKEN_HERE}" \
    --header "Content-Type: application/json" \
    --data "{\"event_id\": \"qTtZdczOccgaPncGJaCiLg\",\"summary\": \"Board meeting\",\"description\": \"Discuss plans for the next quarter.\",\"start\": \"2026-07-27T15:30:00Z\",\"end\": \"2026-07-27T17:00:00Z\",\"location\": {\"description\": \"Board room\"}}" \
    https://api.cronofy.com/v1/calendars/{CALENDAR_ID}/events
cronofy = Cronofy::Client.new(access_token: '{YOUR_ACCESS_TOKEN_HERE}')
new_event = {
event_id: "qTtZdczOccgaPncGJaCiLg",
summary: "Board meeting",
description: "Discuss plans for the next quarter.",
start: Time.parse("2026-07-27T15:30:00Z"),
end: Time.parse("2026-07-27T17:00:00Z"),
location: {
description: "Board room"
}
}
cronofy.upsert_event(calendar_id, new_event)var cronofy = new CronofyAccountClient("{YOUR_ACCESS_TOKEN_HERE}");
var eventBuilder = new UpsertEventRequestBuilder()
.EventId("uniq-id")
.Summary("Event summary")
.Description("Event description")
.Start(2026, 7, 27, 17, 00)
.End(2026, 7, 27, 17, 30)
.Location("Meeting room");
cronofy.UpsertEvent(calendarId, eventBuilder);var options = {
access_token: '{YOUR_ACCESS_TOKEN_HERE}',
event_id: "qTtZdczOccgaPncGJaCiLg",
summary: "Board meeting",
description: "Discuss plans for the next quarter.",
start: "2026-07-27T15:30:00Z",
end: "2026-07-27T17:00:00Z",
location: {
description: "Board room"
}
};
cronofy.createEvent(options)
.then(function () {
// Success
});$cronofy = new Cronofy('', '', '{YOUR_ACCESS_TOKEN_HERE}', '');
$params = array(
'calendar_id' => $calendarId,
'event_id' => 'qTtZdczOccgaPncGJaCiLg',
'summary' => 'Board meeting',
'description' => 'Discuss plans for the next quarter.',
'start' => '2026-07-27T15:30:00Z',
'end' => '2026-07-27T17:00:00Z'
);
$cronofy->upsert_event($params);import pycronofy
cronofy = pycronofy.Client(access_token="{YOUR_ACCESS_TOKEN_HERE}")
event = {
'event_id': "qTtZdczOccgaPncGJaCiLg",
'summary': "Board meeting",
'description': "Discuss plans for the next quarter.",
'start': "2026-07-27T15:30:00Z",
'end': "2026-07-27T17:00:00Z",
'location': {
'description': "Board room"
}
}
cronofy.upsert_event(calendar_id=calendar_id, event=event)Creating an all-day event #
To create an all-day event, you just pass the start and end parameters as ISO 8601 Dates.
Please note that the end parameter is exclusive. The end value is always the day after the end of the all-day event period.
{
  "event_id": "qTtZdczOccgaPncGJaCiLg",
  "summary": "Away for off-site",
  "description": "Discuss plans for the next quarter.",
  "start": "2026-07-27",
  "end": "2026-07-28",
  "tzid": "America/Chicago",
  "location": {
    "description": "Board room"
  }
}
To create the above all-day event you would post the following:
curl -v --header "Authorization: Bearer {YOUR_ACCESS_TOKEN_HERE}" \
    --header "Content-Type: application/json" \
    --data "{\"event_id\": \"qTtZdczOccgaPncGJaCiLg\",\"summary\": \"Away for off-site\",\"description\": \"Discuss plans for the next quarter.\",\"start\": \"2026-07-27\",\"end\": \"2026-07-28\",\"location\": {\"description\": \"Board room\"}}" \
    https://api.cronofy.com/v1/calendars/{CALENDAR_ID}/events
cronofy = Cronofy::Client.new(access_token: '{YOUR_ACCESS_TOKEN_HERE}')
new_event = {
event_id: "qTtZdczOccgaPncGJaCiLg",
summary: "Away for off-site",
description: "Discuss plans for the next quarter.",
start: Date.new(2026, 7, 27),
end: Date.new(2026, 7, 28),
location: {
description: "Board room"
}
}
cronofy.upsert_event(calendar_id, new_event)var cronofy = new CronofyAccountClient("{YOUR_ACCESS_TOKEN_HERE}");
var eventBuilder = new UpsertEventRequestBuilder()
.EventId("qTtZdczOccgaPncGJaCiLg")
.Summary("Away for off-site")
.Description("Event description")
.Start(2026, 7, 27)
.End(2026, 7, 28)
.TimeZoneId("America/Chicago")
.Location("Meeting room");
cronofy.UpsertEvent(calendarId, eventBuilder);var options = {
access_token: '{YOUR_ACCESS_TOKEN_HERE}',
event_id: "qTtZdczOccgaPncGJaCiLg",
summary: "Away for off-site",
description: "Discuss plans for the next quarter.",
start: "2026-07-27",
end: "2026-07-28",
tzid: "America/Chicago",
location: {
description: "Board room"
}
};
cronofy.createEvent(options)
.then(function () {
// Success
});$cronofy = new Cronofy('', '', '{YOUR_ACCESS_TOKEN_HERE}', '');
$params = array(
'calendar_id' => $calendarId,
'event_id' => 'qTtZdczOccgaPncGJaCiLg',
'summary' => 'Away for off-site',
'description' => 'Discuss plans for the next quarter.',
'start' => '2026-07-27',
'end' => '2026-07-28',
'tzid' => 'America/Chicago'
);
$cronofy->upsert_event($params);import pycronofy
cronofy = pycronofy.Client(access_token="{YOUR_ACCESS_TOKEN_HERE}")
event = {
'event_id': "qTtZdczOccgaPncGJaCiLg",
'summary': "Away for off-site",
'description': "Discuss plans for the next quarter.",
'start': "2026-07-27",
'end': "2026-07-28",
'tzid': "America/Chicago",
'location': {
'description': "Board room"
}
}
cronofy.upsert_event(calendar_id=calendar_id, event=event)Also see docs for Create or Update Event.
In This Section
- Time Zones How time and time zones are used with the Cronofy API.
- Filtering Events A summary of the event filtering parameters and how they interact.
- Application Calendars An introduction to Application Calendars and how to use them as a drop in replacement for end-user or resource calendars.
- Editing Events How to edit External Events using the Cronofy API