Public Links
Push Notifications (Web Hooks) for Public Links are how Cronofy notifies your application when a Scheduling Request is made via a Public Link. They will also notify your application in real-time when further updates or changes are made to the Scheduling Request.
Journey #
- A user visits a link provided by your system.
- Your system generates a
claim_tokenand redirects the user to a Public Link with theclaim_tokenadded in query string. - The user proceeds to select a time.
- After a time is confirmed, Cronofy creates a Scheduling Request and also creates an event in the calendar.
- A push notification is sent to your system that includes the notification type and details about the Scheduling Request and event.
Prerequisites #
The Push Notifications can be set up in four steps:
- Authorize your application to the users’ Cronofy Organizational Units via Organization Connect.
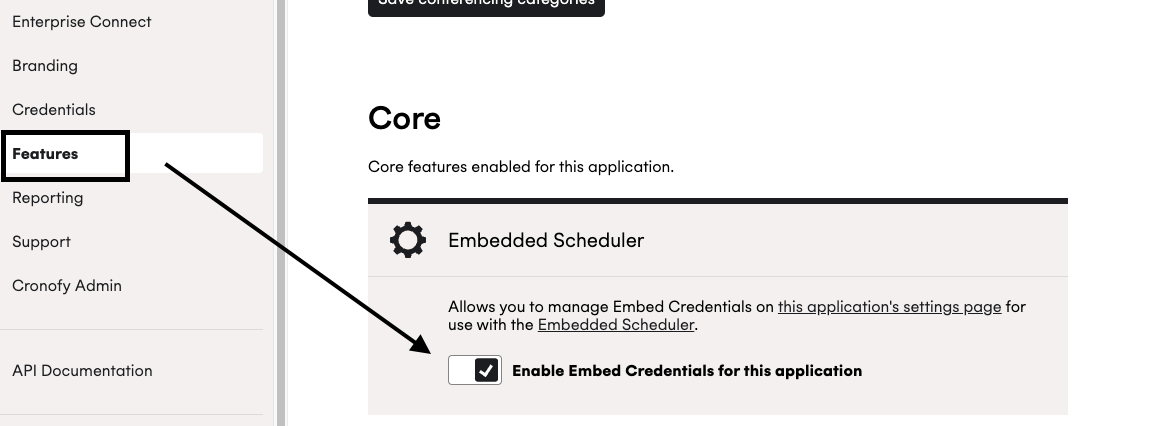
- Enable Embedded Scheduler in your application. To enable the feature visit the Features section for your application in the Cronofy developer dashboard, ensure that “Enable Embed Credentials for this application” is toggled on, then click “Save core features”.
- Generate a new Embed Credentials for
claim_tokengeneration. You can generate the credentials by going to to the “Credentials” section of your application and clicking the “Generate a new embed secret” button.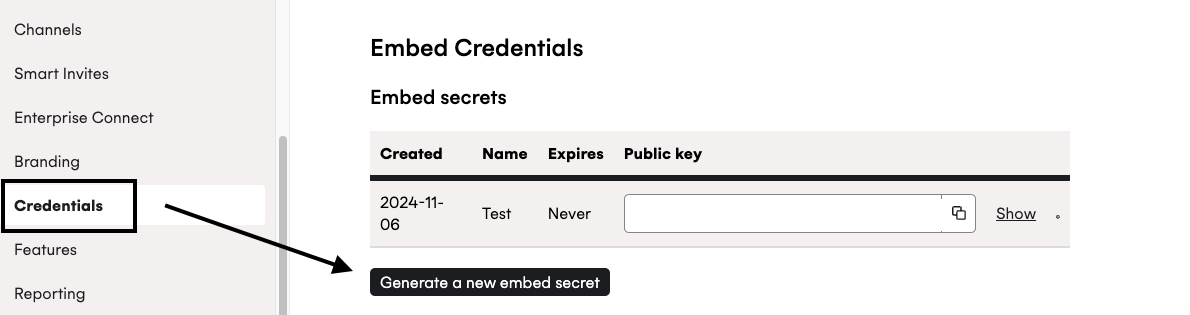
- Set webhook URL to receive updates
- Go to the “Credentials” section of your application settings
- Add the URL in the “Embedded Scheduler webhook callback URL” field and press “Save webhook URL”
Construct a Public Link #
In order to receive updates, a claim_token must be included in the query string of the Public Link URL. You may also want to include a correlation_id so that you can identify which Public Link is being used.
claim_token- required and will be used to identify your application to further trigger the push notifications accordingly.correlation_id- an optional value. This is intended to be set to a meaningful value in your system. It is useful to identify that a Scheduling Request is created via a specific Public Link in your system.
The example URL of a Public Link that will trigger push notifications:
https://app.cronofy.com/pls/Q5-ZDPM8?claim_token={claim-token-jwt}&correlation_id={correlation-id-123}
Use secrets to generate Claim Tokens #
The Claim Token is a JWT (JSON Web Token) signed with your embed secret key.
Claim tokens should be hashed with the HS256 algorithm and signed with your Embed Secret, which begins ESK_
Example token generation code #
# Using the 'jwt' gem: https://github.com/jwt/ruby-jwt
# Set the Embed public and secret keys from the Cronofy dashboard
embed_public_key = ENV.fetch("CRONOFY_SCHEDULER_EMBED_PUBLIC_KEY") # Value starting "EMB_"
embed_secret = ENV.fetch("CRONOFY_SCHEDULER_EMBED_SECRET") # Value starting "ESK_"

jwt_payload = {
  iss: embed_public_key,
  iat: Time.now.to_i,
  exp: Time.now.to_i + (60 * 60 * 4),
  aud: "public_link",
  jti: SecureRandom.uuid,
}

embed_token = JWT.encode(jwt_payload, embed_secret, 'HS256')
// Use the firebase JWT library: https://github.com/firebase/php-jwt
use Firebase\JWT\JWT;
// Set the Embed public and secret keys from the Cronofy dashboard
$embed_public_key = $_ENV["CRONOFY_SCHEDULER_EMBED_PUBLIC_KEY"]; // Value starting "EMB_"
$embed_secret = $_ENV["CRONOFY_SCHEDULER_EMBED_SECRET"]; // Value starting "ESK_"
$jwt_payload = [
"iss" => $embed_public_key,
"iat" => time(),
"exp" => time() + (60 * 60 * 4),
"aud" => "public_link",
"jti" => uniqid(),
];
$embed_token = JWT::encode($jwt_payload, $embed_secret, "HS256");// NOTE: this must be done on the *server* to prevent the Embed secret being visible by clients.
// Use the auth0 JWT library: https://github.com/auth0/node-jsonwebtoken
const jwt = require("jsonwebtoken");
const crypto = require("crypto");
// Set the Embed public and secret keys from the Cronofy dashboard
const embed_public_key = process.env["CRONOFY_SCHEDULER_EMBED_PUBLIC_KEY"]; // Value starting "EMB_"
const embed_secret = process.env["CRONOFY_SCHEDULER_EMBED_SECRET"]; // Value starting "ESK_"
const timestamp = Date.now() / 1000;
const embed_token = jwt.sign(
{
iss: embed_public_key,
iat: timestamp,
exp: timestamp + (60 * 60 * 4),
aud: "public_link",
jti: crypto.randomUUID(),
},
embed_secret,
{
algorithm: "HS256"
}
);using System;
// dotnet add package System.IdentityModel.Tokens.Jwt
using System.IdentityModel.Tokens.Jwt;
using System.Security.Claims;
using Microsoft.IdentityModel.Tokens;
// Set the Embed public and secret keys from the Cronofy dashboard
var embedPublicKey = "EMB_...";
var embedSecret = "ESK_...";
var claims = new Claim[] {
new Claim("iat", DateTimeOffset.UtcNow.ToUnixTimeSeconds().ToString(), ClaimValueTypes.Integer32),
new Claim("jti", Guid.NewGuid().ToString()),
};
var key = new SymmetricSecurityKey(System.Text.Encoding.UTF8.GetBytes(embedSecret));
var signingCredentials = new SigningCredentials(key, "HS256");
JwtSecurityToken jwt = new JwtSecurityToken(
issuer: embedPublicKey,
audience: "public_link",
claims: claims,
expires: DateTime.UtcNow.AddHours(4),
signingCredentials: signingCredentials
);
var signedJwt = new JwtSecurityTokenHandler().WriteToken(jwt);// Using the Auth0 JWT library: https://github.com/auth0/java-jwt
// Takes in the Embed public and secret keys from the Cronofy dashboard
import java.time.Instant;
import java.util.UUID;
import com.auth0.jwt.JWT;
import com.auth0.jwt.algorithms.*;
import com.auth0.jwt.exceptions.*;
/* Inside a class preparing data for your front end, call this and pass the value to your page */
public String generateJWT(String embedPublicKey, String embedSecretKey) {
Algorithm algorithm = Algorithm.HMAC256(embedSecretKey);
String token = JWT.create()
.withIssuer(embedPublicKey)
.withIssuedAt(Instant.now())
.withExpiresAt(Instant.now().plusSeconds(60 * 60 * 4))
.withAudience("public_link")
.withJWTId(UUID.randomUUID().toString())
.sign(algorithm);
return token;
}Payload values #
The following claims should be specified in the payload of your JWT:
iss required #
Your Embed public key, the value beginningEMB_iat required #
The time the JWT was issued at, as an integer of seconds since the epoch (1970/01/01). The represented time cannot be in the future.exp required #
The time the JWT was expires at, as an integer of seconds since epoch (1970/01/01). The represented time must be in the future.This can be used to limit the valid period for the Public Link. The maximum value accepted is 4 hours after being issued.
aud required #
The audience of the JWT - this should always be the valuepublic_linkjti required #
The ID of the JWT - this is a value used to salt the signing of the JWT and prevent replay attacks, and should be unique to each JWT generated. We recommend using a UUID or GUID.Notification types and example payload #
The notification types and example payload will follow the same format as Embedded Scheduler. Please reference to the Receiving updates for the details.