# Online Booking Tutorial: Ruby
> **INFO:** To follow along with this tutorial, download the [Developer Demo Ruby repo](https://github.com/cronofy/Developer-Demo-Ruby) from GitHub.
This repo contains two branches: `starter`, and `main`.
- The starter code you need to follow along with the tutorial is on the `starter` branch. Checkout this branch if you want to work through the tutorial step-by-step.
- The completed code for the tutorial is on the `main` branch. Checkout this branch if you want to view the full, finished code for the tutorial.
You will also need a Cronofy account. You can sign up or log in on our [website](https://www.cronofy.com/)
Cronofy's calendar synchronization and scheduling API enables a rich suite of functionality in any app. Getting started is a quick and straightforward process. This tutorial will guide you through the process of integrating the Cronofy ruby gem into your own application. You'll see for yourself just how easy it is to check availability and schedule an event.
- [What we'll be building](#what-we-ll-be-building)
- [Before you start](#before-you-start)
- [Step 1. Setup the SDK](#step-1-setup-the-sdk)
- [Step 2. The "Home" page](#step-2-the-home-page)
- [Step 3. View your availability](#step-3-view-your-availability)
- [Step 4. Add an event to our calendar](#step-4-add-an-event-to-our-calendar)
- [Troubleshooting](#troubleshooting)
- [Next steps](#next-steps)
## What we’ll be building
We'll create a three-page application that will allow you to connect a calendar account, view your availability, and create a new event.
For page one, we'll cover the steps necessary to authenticate a new calendar profile and [list the connected calendars](/developers/api/calendars/list-calendars/index.md).
For page two, we'll make an [Availability Query](/developers/api/scheduling/availability/index.md) request to view your availability and select a time-slot to book your event.
Finally, in page three, we'll add the new event to your calendar and display a confirmation.
## Before you start
### Creating a new app in the Cronofy dashboard
Before we can create our own application, we need a Cronofy account to connect to. Log into your account, and select Developer from the left-hand side menu (if you cannot see this option, check how to unhide developer tools [here](/developers/faqs/application-management/developer-tools/index.md)).
There you'll see the "Create new app" button; clicking this will generate a new application with a new `client ID`, `client secret` and `SDK Identifier`. You'll need these to authenticate your own app with the Cronofy API, and they can be found on your app's dashboard page.
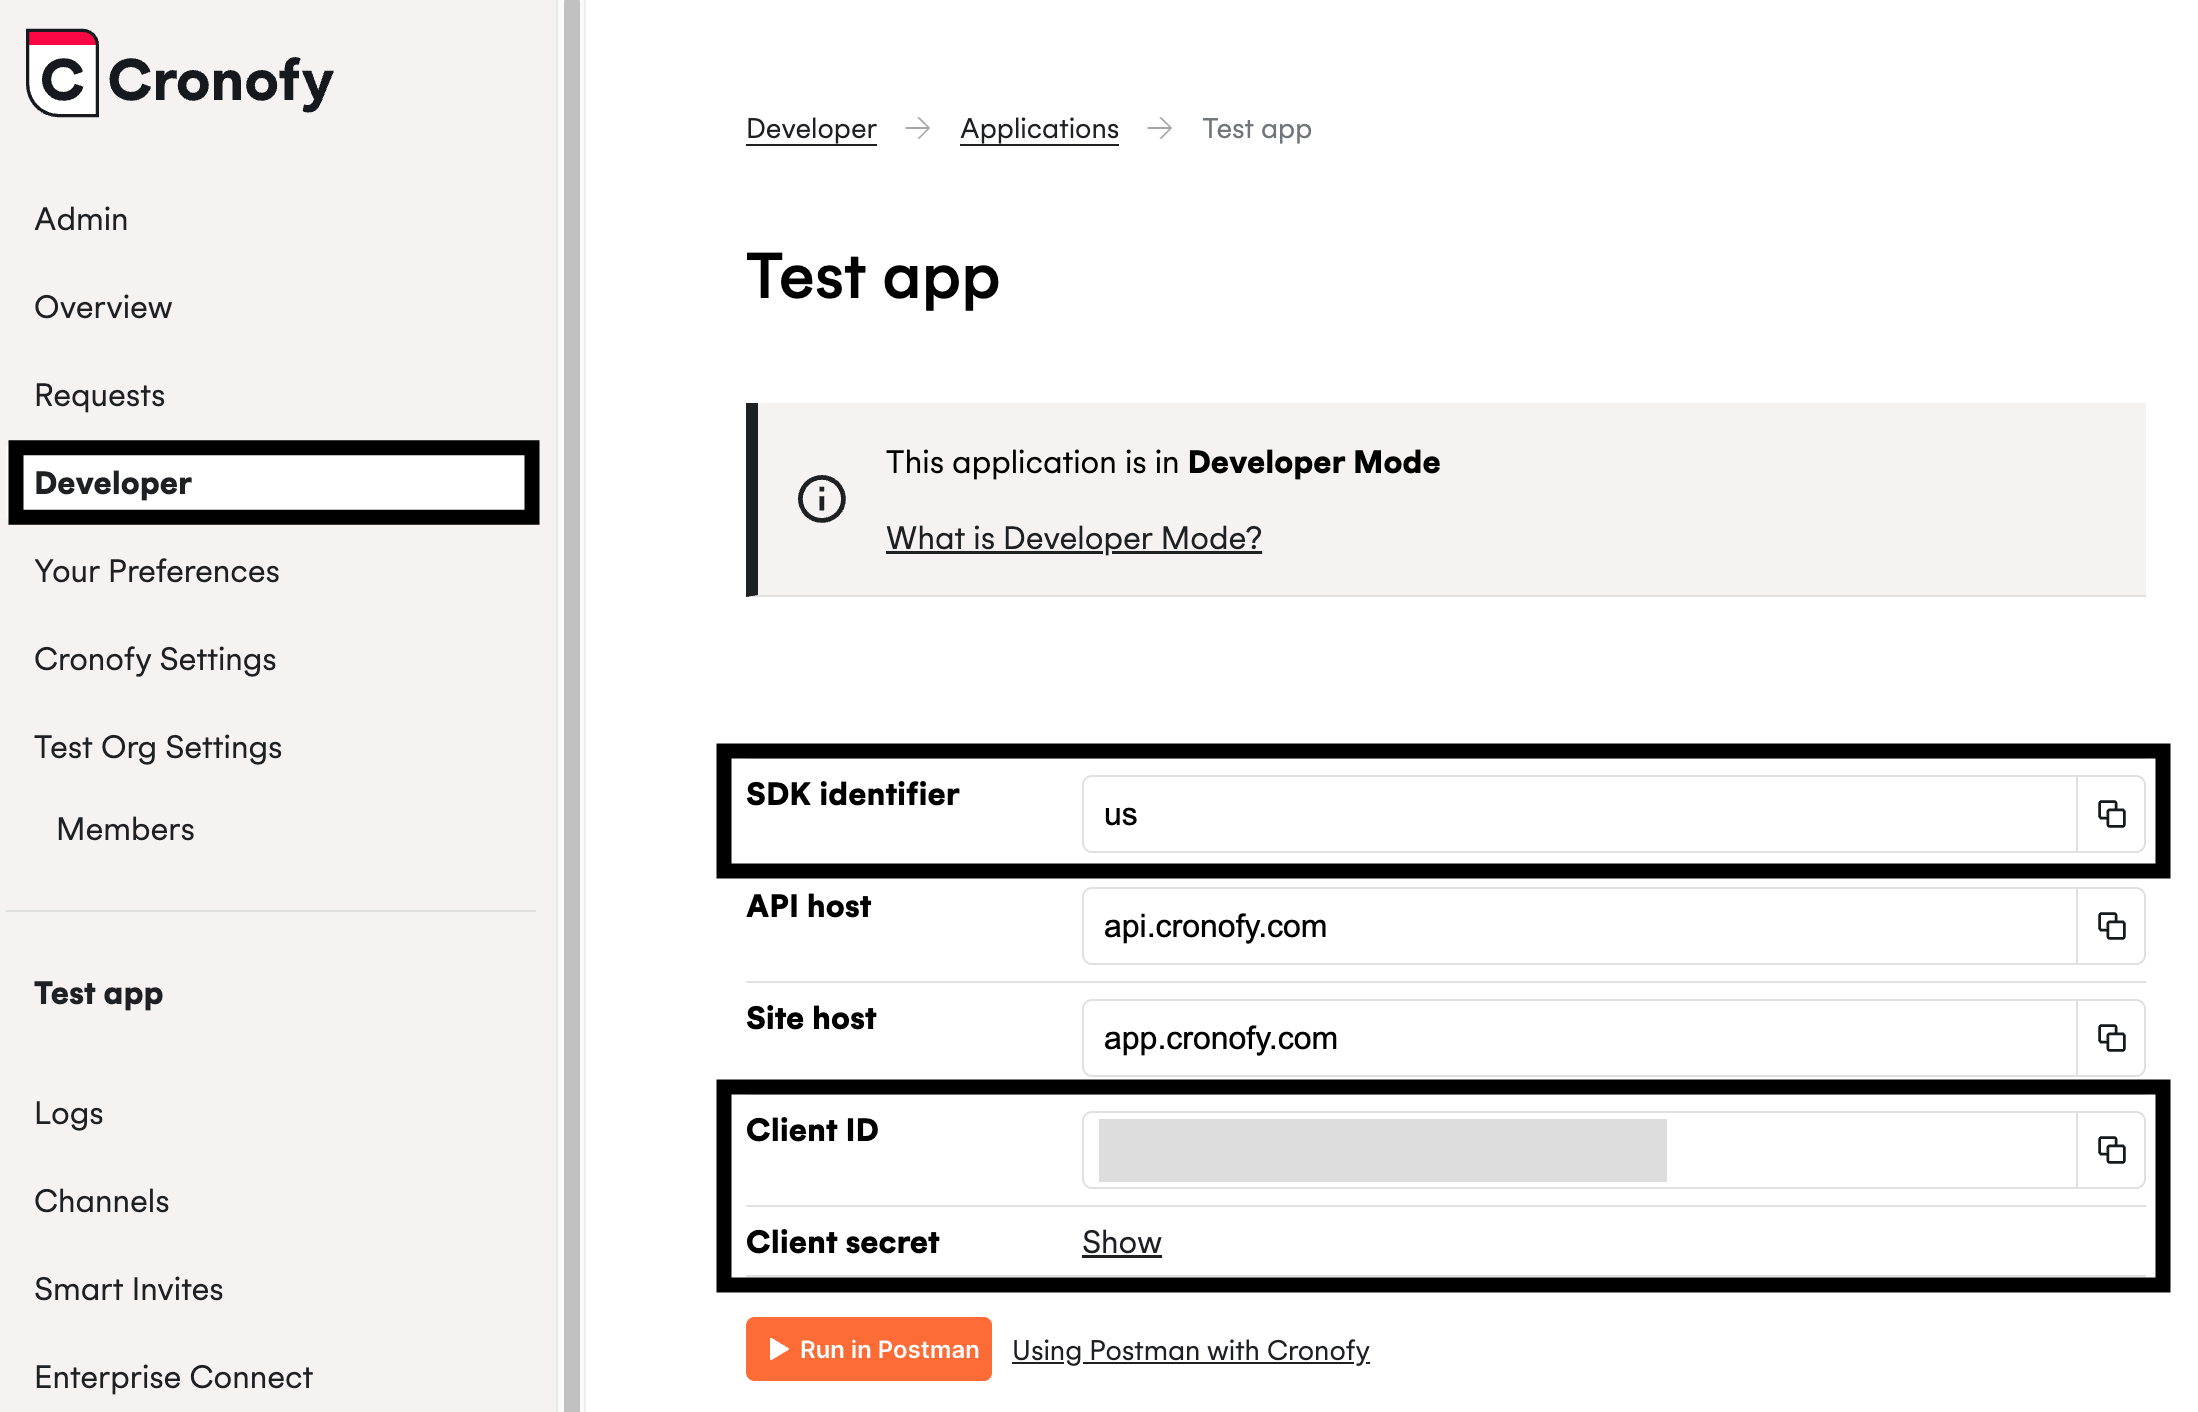
Once you have created your application, there will be a prompt for you to authorize access to a calendar. We can skip this step for now because we will be authorizing access to a calendar using the `cronofy.get_token_from_code` action in Step 2.
### Setup your own application
You'll also need to setup the scaffolding for your application in whichever language or framework you're most comfortable with. For this tutorial we'll be using [Ruby on Rails](https://rubyonrails.org/)
If you want to follow along with this tutorial, you can download the starter-project here: [Developer Demo Ruby repo](https://github.com/cronofy/Developer-Demo-Ruby).
This will provide you with a working Ruby on Rails app; it comes with all the routing already set up for you. Follow the instructions in that repo's `README.md` to download the dependencies and start the app server.
For our app, the folder structure will look like this:
```
app/
controllers/
views/
config/
credentials.yml.enc
master.key
routes.rb
.gitignore
Gemfile
README.md```
- `credentials.yml.enc` is an encrypted file where we'll store our client key and client secret.
- `master.key` is a hash string that is used to decrypt the `credentials.yml.enc` file (This file should NOT be committed to version control).
- `Gemfile` stores the information about our Ruby dependencies. Running `bundle install` after the repo has been downloaded will install all the dependencies.
- The `controllers/` directory is where we will handle our API requests.
- The `views/` directory contains `.html.erb` templates to provide the markup for each page.
> **WARNING:** It's important not to expose any credentials (such as your **client_secret** or **client_key**) in code that is accessible from the client. Doing so will let any malicious users query calendars as if they were your application.
In the tutorial project, these keys are saved into an encrypted file `credentials.yml.enc` that is encrypted using the hash within the `master.key` file. The `master.key` file should never be committed to version control in a Rails project.
## Step 1. Setup the SDK
We'll be making use of the **[cronofy-ruby](https://github.com/cronofy/cronofy-ruby)** gem. There are [Cronofy SDKs](/developers/api-libraries/index.md) for most major languages, and the concepts covered in this tutorial will apply to whichever language you choose to use.
**cronofy-ruby** can be installed in your project using **bundler**. To install, add this line to your applications `Gemfile`:
```ruby
gem 'cronofy'
```
then navigate to the root directory of your project and run this command:
```bash
bundle install
```
This will install the `cronofy` gem and add the details to the `Gemfile.lock`.
Once you've included the gem, the next step is to add your own credentials (the **client ID** and **client secret** we created in the [Before you start](#before-you-start) section) to the `credentials.yml.enc` file and generate your `master.key` file. It's important to keep these credentials secure, and part of that security includes keeping your credentials out of version control. For that reason, we've included the both the `master.key` and `credentials.yml.enc` files in the `.gitignore`.
To set your credentials, navigate to the root directory of the project and run `rails credentials:edit`. This will generate your `master.key` file and open the `credentials.yml.enc` file where you can store your credentials like this:
```ruby
cronofy:
client_id: CLIENT_ID_GOES_HERE
client_secret: CLIENT_SECRET_GOES_HERE
data_center: DATA_CENTER_ID_GOES_HERE
```
> **INFO:** If you are struggling to save the credentials within the `credentials.yml.enc` file you may need to run `EDITOR="code --wait" rails credentials:edit`. Replace `code` with your editor of choice, or leave the value as `code` for VSCode.
We've [already shown](#creating-a-new-app-in-the-cronofy-dashboard) how to find your `client_id` and `client_secret`.
The `data_center` variable is to ensure requests are made to the [data center](/developers/data-centers/index.md) your developer account is linked to. By default, API requests are made to the USA data center. You can find the value for this variable in your app dashboard listed as **SDK Identifier**.
Now that our credentials are ready to be used, we can start using the Cronofy SDK to make calls to the API.
The ruby SDK does this via the `Cronofy::Client` class, which we'll create next.
Within the `application_controller.rb` file, place the following code within the `cronofy_client` action:
```ruby
client_id = Rails.application.credentials[:cronofy][:client_id]
client_secret = Rails.application.credentials[:cronofy][:client_secret]
data_center = Rails.application.credentials[:cronofy][:data_center]
```
This will fetch the `client_id`, `client_secret` and `data_center` which we just encrypted into our credentials file, allowing us to use them within our `Cronofy::Client`.
Next, we will add the following code below the keys to instantiate our new client:
```ruby
Cronofy::Client.new(
client_id: client_id,
client_secret: client_secret,
data_center: data_center
)
```
## Step 2. The “Home” page
Now we've setup our `Cronofy::Client` instance, it's time to put it use. The first page in our application will be our "home" page where we can add and remove connected calendar profiles.
### Authorization
The first step in enabling a user to connect their calendar is to generate a link that will take them through the authorization process. The user will click that link to go through the authorization process and grant access to their calendar. Cronofy uses [OAuth2](https://www.rfc-editor.org/rfc/rfc6749) as a model for much of its authorization. This process will return a code which we will then use to retrieve the `ACCESS_TOKEN` and `sub`, using the `cronofy.get_token_from_code` action.
To generate the link add the following to the `index` action within the `users_controller.rb` file:
```ruby
@cronofy = cronofy_client
@authorization_url = @cronofy.user_auth_link('http://localhost:3000/oauth2/callback')
```
You will notice that within the `config/routes.rb` we already have the neccessary routes configured for us.
Then within the `views/` directory, open the `users/index.html.erb` file and replace the `"#"` of the `link_to` with `@authorization_url`.
The next step is to ensure we capture the `ACCESS_TOKEN` and `sub`. These tokens will allow us to make requests on behalf of an [Account](developers/authorization/index.md), rather than as our Application, which is how we've made our calls so far. To do this, we will add the following code to the `connect` action within the `users_controller.rb` file:
```ruby
@cronofy = cronofy_client()
code = [params[:code]]
response = @cronofy.get_token_from_code(code, 'http://localhost:3000/oauth2/callback')
if User.where(account_id: response.account_id).exists?
user = User.find_by(account_id: response.account_id)
user.update(
access_token: response.access_token,
refresh_token: response.refresh_token
)
user.save
else
user = User.create(
account_id: response.account_id,
access_token: response.access_token,
refresh_token: response.refresh_token
)
end
redirect_to root_path
```
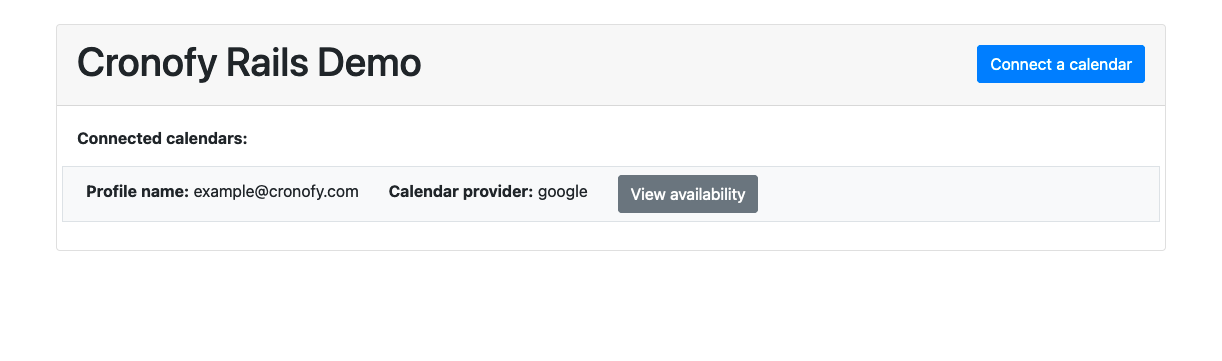
Now if you run `rails s` from the root directory of your app, and then navigate to `http://localhost:3000/` you will be able to see the button to connect a calendar.
Clicking this will send you through the Oauth process and allow you to connect a calendar to your cronofy account.
### Viewing the connected calendars
Now that you have a calendar connected, we can make an API call to [List Calendars](/developers/api/calendars/list-calendars/index.md).
To do this we will first be modifying the client instantiation within the `application_controller.rb` file. Replace the existing client with the following code:
```ruby
if user
Cronofy::Client.new(
client_id: client_id,
client_secret: client_secret,
data_center: data_center,
access_token: User.first.access_token,
refresh_token: User.first.refresh_token
)
else
Cronofy::Client.new(
client_id: client_id,
client_secret: client_secret,
data_center: data_center
)
end
```
What this allows us to do is offer as much authentication as possible based on whether we are making a request on behalf of the [Application](/developers/authorization/index.md) or on behalf of an [Account](/developers/authorization/index.md).
Next, we will be modifying the code in our `index` action in `users_controller.rb` file. We will be making a check to see if there is a `User.first` so that we can pass it to the `cronofy_client` and get the relevant client to make the `list_calendars` call.
We're going to skip any user management in this tutorial and instead always use User.first. This will help us focus on our interaction with the Cronofy APIs, but you will want to look up the user sub and access token for the user you are acting as (i.e. the currently logged in user).
Find the `@cronofy = cronofy_client` within the `index` action of the `users_controller.rb` file and replace it with the following code:
```ruby
if User.first
@cronofy = cronofy_client(User.first)
@calendars = @cronofy.list_calendars
else
@cronofy = cronofy_client
@calendars = []
end
```
In this snippet, we're deciding if we have a User or not.
If we do, we create a Cronofy client for that user and then call the `list_calendars` method to query the Cronofy
[list calendars](/developers/api/calendars/list-calendars/index.md) endpoint.
The response from this request is wrapped in an object for easier manipulation.
We'll now use these values to show the calendars on our page.
To view the calendars on the front end, open the `users/index.html.erb` file within the `views/` directory and add in the following code within the `card-body` div.
```ruby
**Connected calendars:**
<% @calendars.each do |calendar| %>
**Profile:** <%= calendar.profile_name %> (<%= calendar.provider_name %>)
**Calendar name:** <%= calendar.calendar_name %>
<%= link_to 'View availability', calendar_path(calendar.calendar_id), class: "btn btn-secondary" %>
<% end %>
```
If you refresh your app within your browser window, you will now see the information on the connected calendars. You will notice there is a button to "View Availability". We will be adding in this functionality in the next step.
> **INFO:** If at this stage or any stage beyond this you encounter errors, it may be related to your access token expiring. For simplicity this demo app does not handle storing and refreshing of access tokens. If you do encounter this problem, you will need to go through Authorization
again to refresh your token.
## Step 3. View your Availablility
For the second page of our application, we want to be able to view our availability for a set period of time, and to be able to select a time slot to create a new event. We can do this by making an [Availability](/developers/api/scheduling/availability/index.md) call.
First we will need to do some set up to ensure we have the relevant information available in our `show` action within our `calendars_controller.rb` file. Open up this file and place the following code at the top of the `show` action:
```ruby
@cronofy = cronofy_client(User.first)
sub = User.first.account_id
@calendar_ids = [params[:id]]
@duration_minutes = 60
```
Now we need to construct an availability query.
### Constructing an availability query
In short the availability query is an object that matches a valid Cronofy [Availability](/developers/api/scheduling/availability/index.md) request. This query defines three things:
- The participants that we want to query.
- The required duration of the event we want to book.
- An array of periods to check availability in.
For this application, our participants object can be relatively simple. We only want to check our own availability for the selected calendar, so we only need to add our own profile (using the `sub` of our account), along with the calendar id we are querying:
```ruby
"participants": [
{
"members": [
{
"sub": sub,
"calendar_ids": @calendar_ids,
}
]
}
]
```
The `required_duration` is set in minutes, and must be greater than zero. It describes the minimum period that a participant must have free for a period to be deemed as available.
`query_periods` is an array of hashes with a `start` and `end` time. Both should be a valid [`Time`](/developers/api/data-types/index.md) data-type, and must represent a future point in time. The `end` of an available period must also be at least 1 minute after the corresponding `start` and within 35 days of the earliest `start`.
For example, to query between 9-10 UTC and 15:00-17:30 UTC, we would set this to:
```ruby
query_periods: [
{
start: "2026-05-02T09:00:00Z",
end: "2026-05-02T10:00:00Z"
},
{
start: "2026-05-02T15:00:00Z",
end: "2026-05-02T17:30:00Z"
}
]
```
> **WARNING:** The start and end time need to be added as UTC strings, so be sure to adjust them for your timezone.
Your Availability query should eventually look like this:
```ruby
@request = {
"participants": [
{
"members": [
{
"sub": sub,
"calendar_ids": @calendar_ids,
}
],
}
],
"response_format": "slots",
"required_duration": { "minutes": @duration_minutes },
"available_periods": [
{
start: "2026-05-02T09:00:00Z",
end: "2026-05-02T10:00:00Z"
},
{
start: "2026-05-02T15:00:00Z",
end: "2026-05-02T17:30:00Z"
}
]
}
```
Now that we have constructed our availability query we can add the following line to make the call to the API:
```ruby
@available_periods = @cronofy.availability(@request)
```
Next we will format the response to view on the front end as selectable slots.
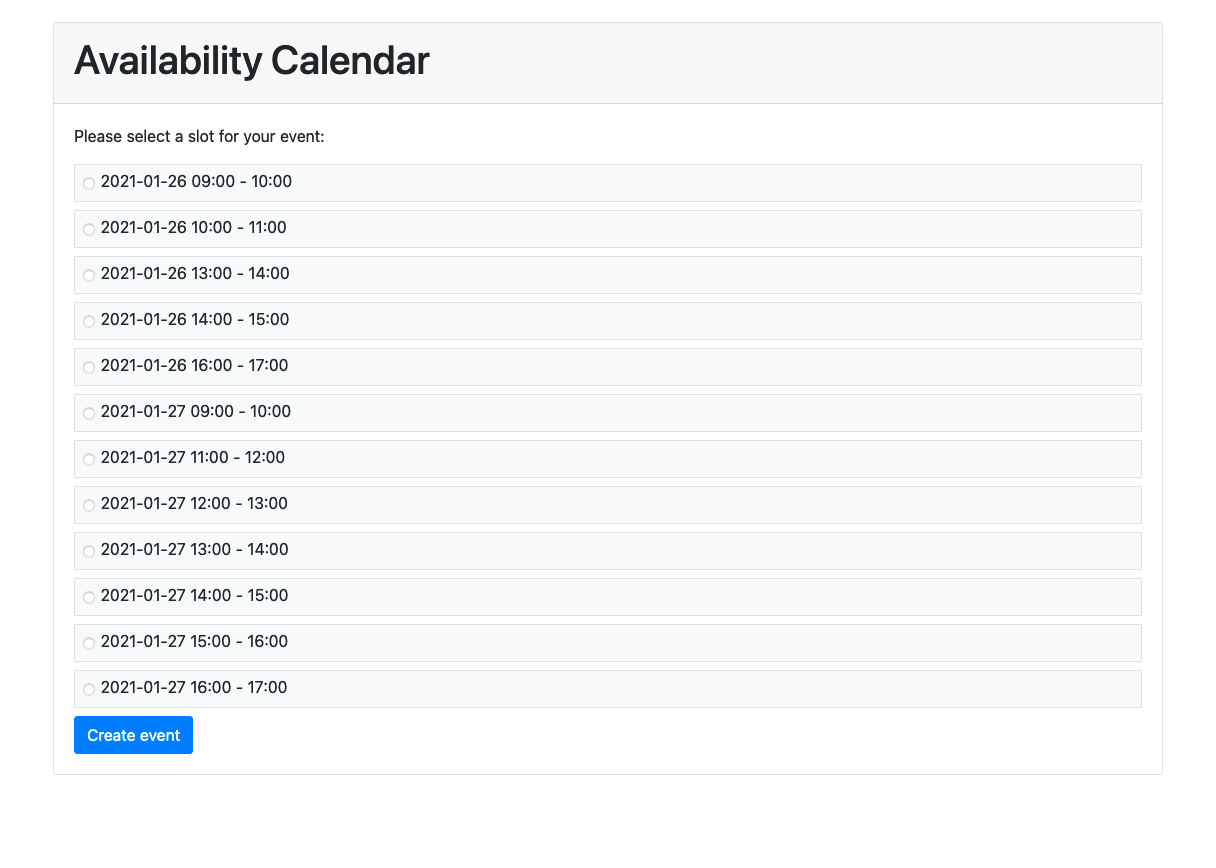
### Viewing your availability
Before we create an event, we need to view the availability on the front end and enable the user to select a slot.
You will notice that in the availability query we just constructed, that we added a `response_format` with a value of `slots`. This will generate non-overlapping slots with a length equal to the `required_duration`.
To view these slots, find the `` within the `calendars/show.html.erb` file and place the following code inside it:
```ruby
<%= form_with do |form| %>
<% @available_periods.each do |period| %>
<%= label_tag "slot_#{period.start.time.strftime('%Y-%m-%d_%H%M')}" do %>
<%= form.radio_button :slot, period.start.time.strftime("%Y-%m-%d_%H:%M") %>
<%= period.start.time.strftime("%Y-%m-%d %H:%M") %> - <%= period.end.time.strftime("%H:%M") %>
<% end %>
<% end %>
<%= form.hidden_field :duration_minutes, value: @duration_minutes %>
<%= button_to "Create event", { action: "create" }, class: "btn btn-primary" %>
<% end %>
```
If you now click on the "View Availablility" button on the index page, you should see a page very similar to this:

Cronofy has calculated all of the times our participant is available and returned those times, which we have now displayed on the page.
We are now ready to create an event.
## Step 4. Add an event to our calendar
The last page of our app is where we’ll actually add an event to our calendar. We’re being given the start time in the slot query parameter, and we’ll use the `duration_minutes` to calculate the end time for our event. We then need to parse that into an object we can use.
### Formatting an event
To add an event to a calendar, we’ll need to create an object that will match the format required by the [Create or Update Event](/developers/api/events/upsert-event/index.md) section of the API.
In addition to the start and end time, we’ll need to add a unique `event_id`, a text `summary` and `description`, and the `calendar_id` of the calendar we want to add the event to.
In the `calendars_controller.rb` file, place the following code within the `create` action:
```ruby
@cronofy = cronofy_client(User.first)
calendar_id = params[:id]
start_time = Time.parse(params[:slot])
end_time = start_time + params[:duration_minutes].to_i.minutes
@event_data = {
event_id: 'uniq-id',
summary: 'Demo event summary',
description: 'Demo event description',
start: start_time,
end: end_time,
location: {
description: "Meeting room"
}
}
@cronofy.upsert_event(calendar_id, @event_data)
```
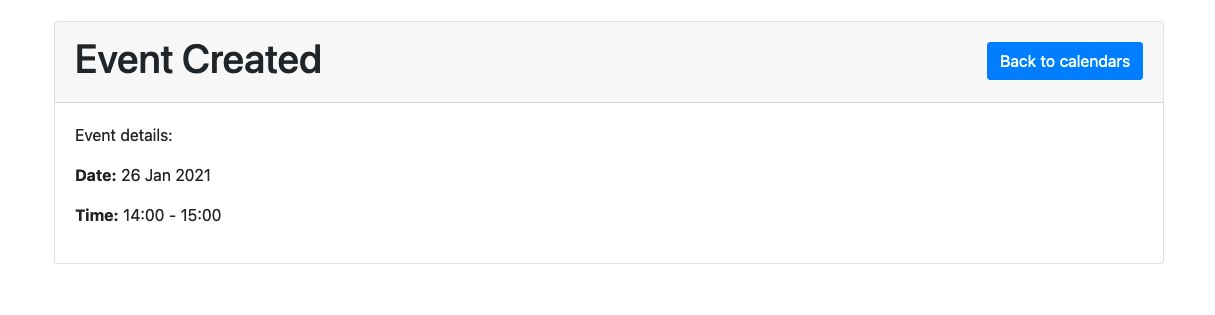
Now in our application, if you select a slot and click "Create event" you should see a confirmation screen showing you the date and time of the event you just created. You will also see the event created on your calendar.
We've completed a full end-to-end journey in our application - we've connected the users calendars, made an Availability query and finally created an event in their calendar!
## Troubleshooting
If you encounter unexpected errors at any stage, be sure to check the browser's console and the command line output.
A common issue is that the [access token](/developers/api/authorization/request-token/index.md) may have expired, so double check that your access token is fresh. For simplicity this demo app does not handle storing and refreshing of access tokens.
If you have been following along step-by-step in the [`starter`](https://github.com/cronofy/Developer-Demo-Ruby/tree/starter) branch of the GitHub repo, try switching to the [`main`](https://github.com/cronofy/Developer-Demo-Ruby/tree/main) branch which includes some basic functionality to refresh your access token.
## Next steps
- [API Reference *Browser the full API documentation.*](/developers/api/index.md)
- [Getting Started *Read more tutorials and guides*](/developers/getting-started/index.md)
---
[Read in HTML](/developers/getting-started/developer-demo-ruby/)