Online Booking Tutorial: NodeJS
Read as MarkdownCronofy’s calendar synchronization and scheduling API enables a rich suite of functionality in any app. Combined with the companion UI Elements, getting started is a quick and straightforward process. This tutorial will guide you through the process of integrating Cronofy into your own application. You’ll see for yourself just how easy it is to check availability and schedule an event.
- What we’ll be building
- Before you start
- Step 1. Setup the SDK
- Step 2. The “Home” page
- Step 3. View your availability
- Step 4. Add an event to our calendar
- Step 5. [Optional extra] Set your rules
- Troubleshooting
- Next steps
What we’ll be building #
We’ll create a three-page application that will allow you to connect a calendar account, view your availability, and create a new event.
For page one, we’ll add the Calendar Sync UI Element and cover the steps necessary to authenticate a new calendar profile.
For page two, we’ll use the Date Time Picker Element to view your availability and select a time-slot to book your event.
And in page three, we’ll add the new event to your calendar and display a confirmation.
Before you start #
Creating a new app in the Cronofy dashboard #
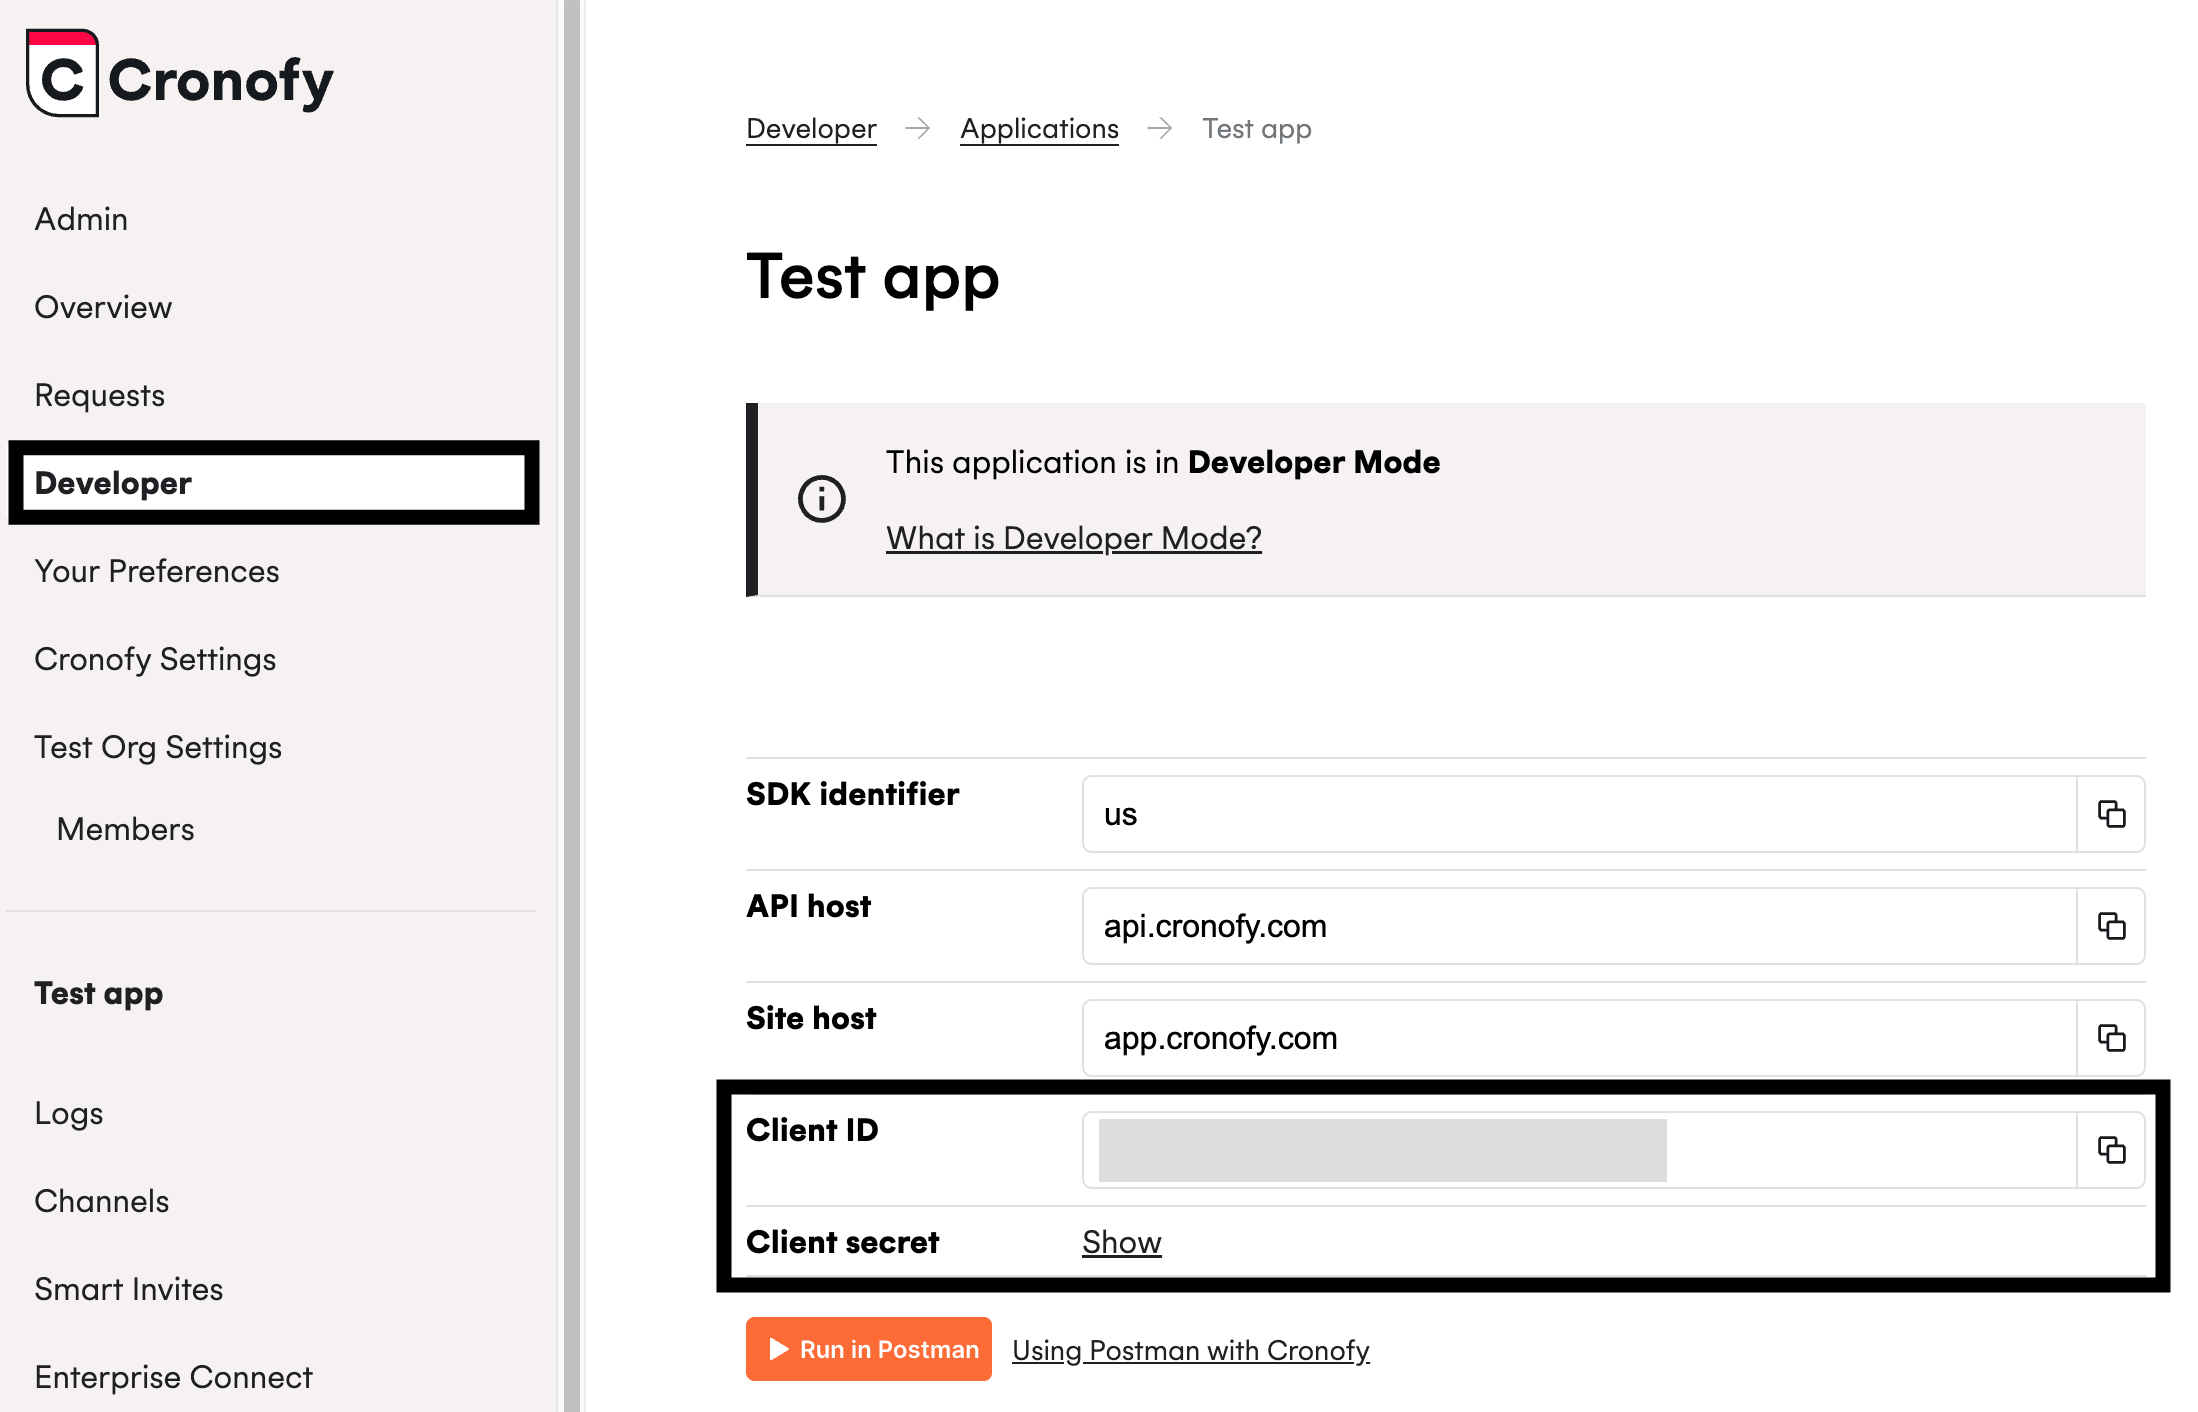
Before we can create our own application, we need a Cronofy account to connect to. Log into your account, and select Developer from the left-hand side menu (if you cannot see this option, check how to unhide developer tools here).
There you’ll see the “Create new app” button; clicking this will generate a new application with a new client ID and client secret. You’ll need these to authenticate your own app with the Cronofy API, and they can be found if you navigate to your application from the ‘Developer’ dashboard.
Once you have created your application, there will be a prompt for you to authorize access to a calendar. We can skip this step for now because we will be authorizing access to a calendar using the Calendar Sync UI Element in Step 2.
Setup your own application #
You’ll also need to setup the scaffolding for your application in whichever language or framework you’re most comfortable with. For this tutorial we’ll be using Node.js, and the app structure and routing will be handled by Express.js, with EJS as our templating language.
If you want to follow along with this tutorial, you can download the starter-project here: Developer Demo Starter repo.
This will provide you with a working Express app; it comes with all the routing already set up for you. Follow the instructions in that repo’s README.md to download the dependencies and start the app server.
For our app, the folder structure will look like this:
app/
    app.css
    server.js
    templates/
        availability.ejs
        home.ejs
        submit.ejs
.env
.gitignore
package.json
README.md
.envis where we’ll store our client key and client secret (for our project, this file is ignored by GIT).app.cssis a stylesheet that contains the basic styles for this project.package.jsonstores the information about our Node dependencies. Runningnpm installafter the repo has been downloaded will install all the dependencies into anode_modules/directory in the root of the project.server.jsis where we configure our Express settings and add the server-side portions of our code.- The
templates/directory contains.ejstemplates to provide the markup for each page, and the frontend portions of our code will be placed in these files (using inline<script>tags).
Step 1. Set up the SDK #
We’ll be making use of the cronofy-node SDK. There are Cronofy SDKs for most major languages, and the concepts covered in this tutorial will apply to whichever language you choose to use.
cronofy-node can be installed in your project using npm. To install, navigate to the root directory of your project and run this command:
npm install --save cronofyThis will install the cronofy package into your project’s node_modules directory, and add the details to the dependencies object in your package.json file. Once Cronofy Node has been installed, you can import it into your JavaScript files with a require() statement:
const Cronofy = require("cronofy");Once you’ve included the SDK, the next step is to instantiate a new instance with your own credentials (the client ID and client secret we created in the Before you start section). It’s important to keep these credentials secure, and part of that security includes keeping your credentials out of version control. For that reason, we’ve included the dotenv package in our starter-project, which allows us to set our credentials as environment variables. We’ll store these variables in our .env file like this:
// .env
CLIENT_ID="YOUR_CLIENT_ID"
CLIENT_SECRET="YOUR_CLIENT_SECRET"
ACCESS_TOKEN="YOUR_ACCESS_TOKEN_GOES_HERE"
SUB="YOUR_SUB_GOES_HERE"
DATA_CENTER="YOUR_DATA_CENTER_ID_GOES_HERE"
This allows us to use our environment variables with the process.env.VARIABLE_NAME format. For example, if you see process.env.DATA_CENTER, the data center information will automatically be pulled from your .env file without you needing to manually edit this in the code.
We’ve already shown how to find your CLIENT_ID and CLIENT_SECRET. A SUB will be required when we generate our Element tokens in Step 2, and we’ll cover this in more detail when we reach that step. Similarly, the ACCESS_TOKEN will be required when we add events to a calendar in Step 4, and we’ll cover that in more detail when the time comes. For now, feel free to leave the SUB and ACCESS_TOKEN environment variables set to the placeholder strings.
The DATA_CENTER variable is to ensure requests are made to the data center your developer account is linked to. By default, API requests are made to the USA data center. You can find the value for this variable in your app dashboard listed as SDK Identifier.
Add const Cronofy = require("cronofy"); to the top of the server.js file, alongside the other dependencies’ require() statements. Then add the following code to initialize a cronofyClient instance:
const cronofyClient = new Cronofy({
    client_id: process.env.CLIENT_ID,
    client_secret: process.env.CLIENT_SECRET,
    data_center: process.env.DATA_CENTER
});
Step 2. The “Home” page #
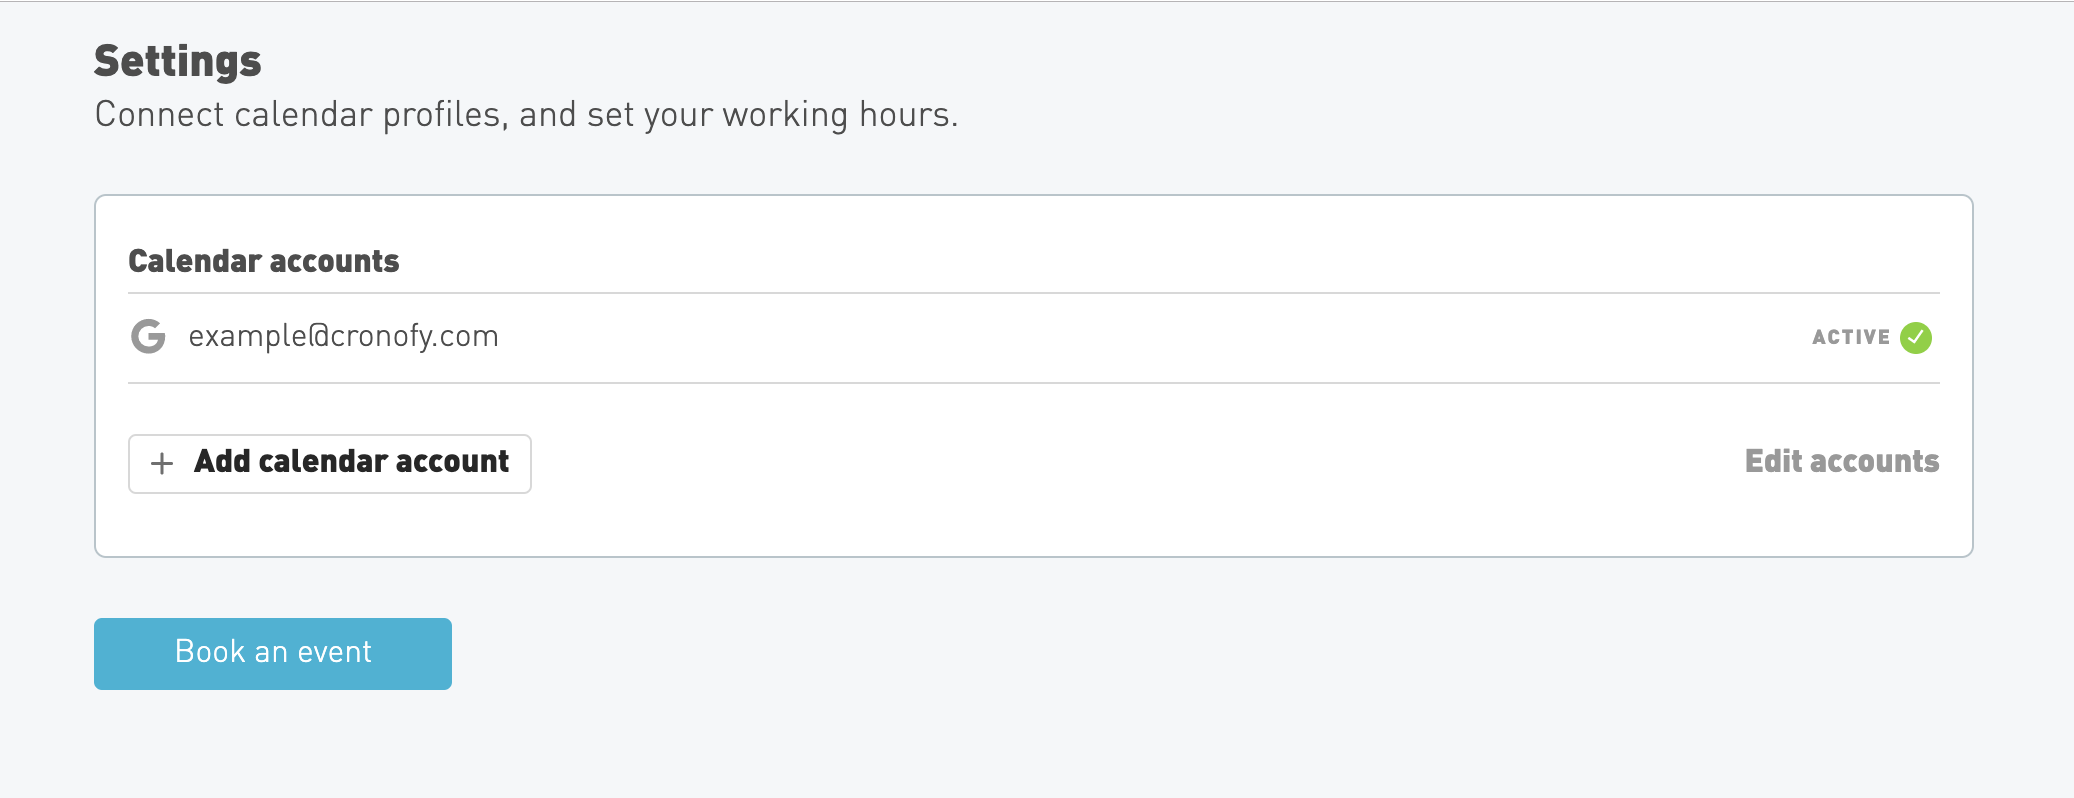
Now we’ve setup our cronofyClient instance, it’s time to put it use. The first page in our application will be our “home” page where we can add and remove connected calendar profiles, and we can achieve this functionality by making use of the Calendar Sync UI Element.
Introduction to UI Elements #
Cronofy’s UI Elements are a suite of embeddable JavaScript components that provide user interface overlays to various Cronofy API endpoints. To be able to use the UI Elements within your own application, you need to include the Element’s source .js file into your home.ejs page above the <title> tag:
https://elements.cronofy.com/js/CronofyElements.v1.67.7.js
Once you’ve included the .js file in your project, you can initialize the desired Element using the corresponding method and passing in an options as an object.
The Calendar Sync UI Element #
The first Element we will load will be the Calendar Sync Element. This Element fulfills two roles:
- It provides an interface for users to sync their calendars to an application.
- When there are calendars already sync’ed, it provides an interactive display of your users’ synchronization status.
To perform the second of these roles, the Calendar Sync Element requires an Element token to be able to show synchronization status securely. But for the first role we can load it without an Element token. This is the only UI Element that can be loaded without an Element token.
To correctly add a working Calendar Sync Element to our home page, we will need to inject some information from our server into the template. Specifically, to create a functional authorization link (which allows the Calender Sync Element to add profiles to your application), we will need to include our CLIENT_ID in the template.
In the server.js file, find the "/" route for the app:
app.get("/", async (req, res) => {
    return res.render("settings", {});
});
And replace it with this:
app.get("/", async (req, res) => {
    return res.render("home", {
        client_id: process.env.CLIENT_ID,
        data_center: process.env.DATA_CENTER
    });
});
Adding your first UI Element #
Armed with our client ID, we can now add an Element to our page using the home.ejs template.
Every UI Element needs a mounting point on the page. This can be any DOM node you like, provided it has a unique html ID. To add the Calendar Sync Element to our page, we’ll create a <div> with an ID of cronofy-calendar-sync. We’ll use this ID to tell the UI Element script where to put the Element.
Along with the mounting point, the Calendar Sync Element requires some authorization options. We’ll need to include a redirect_uri, your client_id, and a scope (for this Element the scope is always “read_write”). These are used when a new calendar profile is added, as they are required by the oAuth process.
Look for the empty <script> tag toward the bottom of the home.ejs template, and replace it with the following code:
<div class="element__wrapper">
    <div id="cronofy-calendar-sync"></div>
</div>

<script src="https://elements.cronofy.com/js/CronofyElements.v1.67.7.js"></script>
<script>
    CronofyElements.CalendarSync({
        target_id: "cronofy-calendar-sync",
        data_center: "<%= data_center %>",
        authorization: {
            redirect_uri: "http://localhost:7070",
            client_id: "<%= client_id %>",
            scope: "read_write"
        }
    });
</script>
Note that the <div class="element__wrapper"> element is only present to help with the pre-built styling of the demo app, and is not essential - the important thing is that there is a DOM node with a unique ID to mount the UI Element on to.
With that script included in your page, the Calendar Sync Element will be rendered inside the “cronofy-calendar-sync” <div>.
Code redemption #
The next step in the Calendar Sync Element setup is to redeem an authorization code to find our user’s sub value. When users initialize the authorization from within the Calendar Sync UI Element, the auth flow ends with the user being returned to the redirect_uri with a code included as a URL parameter. This code is then redeemed, which completes the authorization process.
The sub value is the canonical identifier for the connected Account in the Cronofy API. We will need a valid sub when we come to generate an Element token. In a real application, you can retrieve the subs of connected accounts using the userinfo endpoint of the API. For this demo, we will retrieve the sub from the response to the code redemption.
When loaded without an Element token, the Calendar Sync UI Element will present us with a choice of calendar providers and a message saying “Select a provider to add your first account”.
This means we need to connect a calendar profile to our application, and to do that we need to be able to complete the authorization process. Users start the authorization flow by clicking one of the provider links, and when the process is complete the user is returned to the redirect_uri with a code included as a URL parameter.
To redeem the code and complete the addition of the new profile, we use the code to request an access token. The new access token is not required within the Element, but needs to be requested to complete the authorization process. This request requires your Client ID and Client Secret, so must take place server-side.
Add the following to the start of the "/" route in server.js:
app.get("/", async (req, res) => {
    // Extract the "code" from the page's query string:
    const codeFromQuery = req.query.code;

    if (codeFromQuery) {
        const codeResponse = await cronofyClient.requestAccessToken({
            client_id: process.env.CLIENT_ID,
            client_secret: process.env.CLIENT_SECRET,
            grant_type: "authorization_code",
            code: codeFromQuery,
            redirect_uri: "http://localhost:7070"
        }).catch((err) => {
            console.error(err);
        });

        console.log(codeResponse);
    }

    // ...template rendering
});
Once that code snippet is added in, you will need to use the UI element in the server to connect to your calendar which will log the resulting codeResponse into your terminal. In addition to the new access_token the response also contains some details about the account that has just been synchronized, including the sub value that we will need when generating an Element token in the next step.
If the below codeResponse doesn’t appear in your terminal after authorising your calendar, we recommend to stop the server connection and reconnect to the server to try authorising your calendar via the UI element again.
{
    "access_token": "THE_ACCESS_TOKEN_WILL_APPEAR_HERE",
    "token_type": "bearer",
    "expires_in": 1209600,
    "refresh_token": "A_REFRESH_TOKEN_WILL_APPEAR_HERE",
    "scope": "read_write read_only create_event delete_event list_calendars read_account read_events",
    "sub": "THE_SUB_WILL_APPEAR_HERE",
    "account_id": "THE_ACCOUNT_ID_WILL_APPEAR_HERE",
    "linking_profile": {
        "provider_name": "google",
        "profile_id": "THE_PROFILE_ID_WILL_APPEAR_HERE",
        "profile_name": "example@cronofy.com",
        "provider_service": "gsuite"
    }
}
Copy the access_token and sub values, and paste them into the SUB and ACCESS_TOKEN entries in your .env file. This means we can now use process.env.SUB and process.env.ACCESS_TOKEN in our server-side code. We’ll be using the sub value in the next step when we generate Element tokens, and we’ll use the access_token in Step 4. when we add an event to our calendar.
Element tokens #
Now that we have access to a valid sub, we can move on to generating an Element token for the Calendar Sync UI Element.
UI Elements require an Element-specific token to handle authentication. To generate a token using the Cronofy Node SDK, you can use the requestElementToken() method. To generate a valid Element token, you will need to know the sub for each profile you want to be able to access.
In the server.js file, find the "/" route for the app and add the following token-generation snippet and inject the resulting element_token into our template:
app.get("/", async (req, res) => {

    // Add this:
    const token = await cronofyClient.requestElementToken({
        version: "1",
        permissions: ["account_management"],
        subs: [process.env.SUB],
        origin: "http://localhost:7070"
    }).catch((err) => {
        console.error(err);
    });

    // ...code-redemption section remains unchanged

    return res.render("home", {
        // Add the element_token to our template:
        element_token: token.element_token.token,
        client_id: process.env.CLIENT_ID,
        data_center: process.env.DATA_CENTER
    });
});
Now when that page loads it generates an Element token (asynchronously) and passes both the element token and the client ID to the page template home.ejs.
You can view the full set of authentication options in the UI Elements’ Authentication documentation.
The final step for adding the Calendar Sync UI Element is to add the element_token to the initialization options for the CronofyElements.CalendarSync() call:
<script>
    CronofyElements.CalendarSync({
        element_token: "<%= element_token %>",
        data_center: "<%= data_center %>",
        target_id: "cronofy-calendar-sync",
        authorization: {
            redirect_uri: "http://localhost:7070",
            client_id: "<%= client_id %>",
            scope: "read_write"
        }
    });
</script>
If you reload the page now, the Calendar Sync UI Element will display the account that you sync’ed earlier in the process.
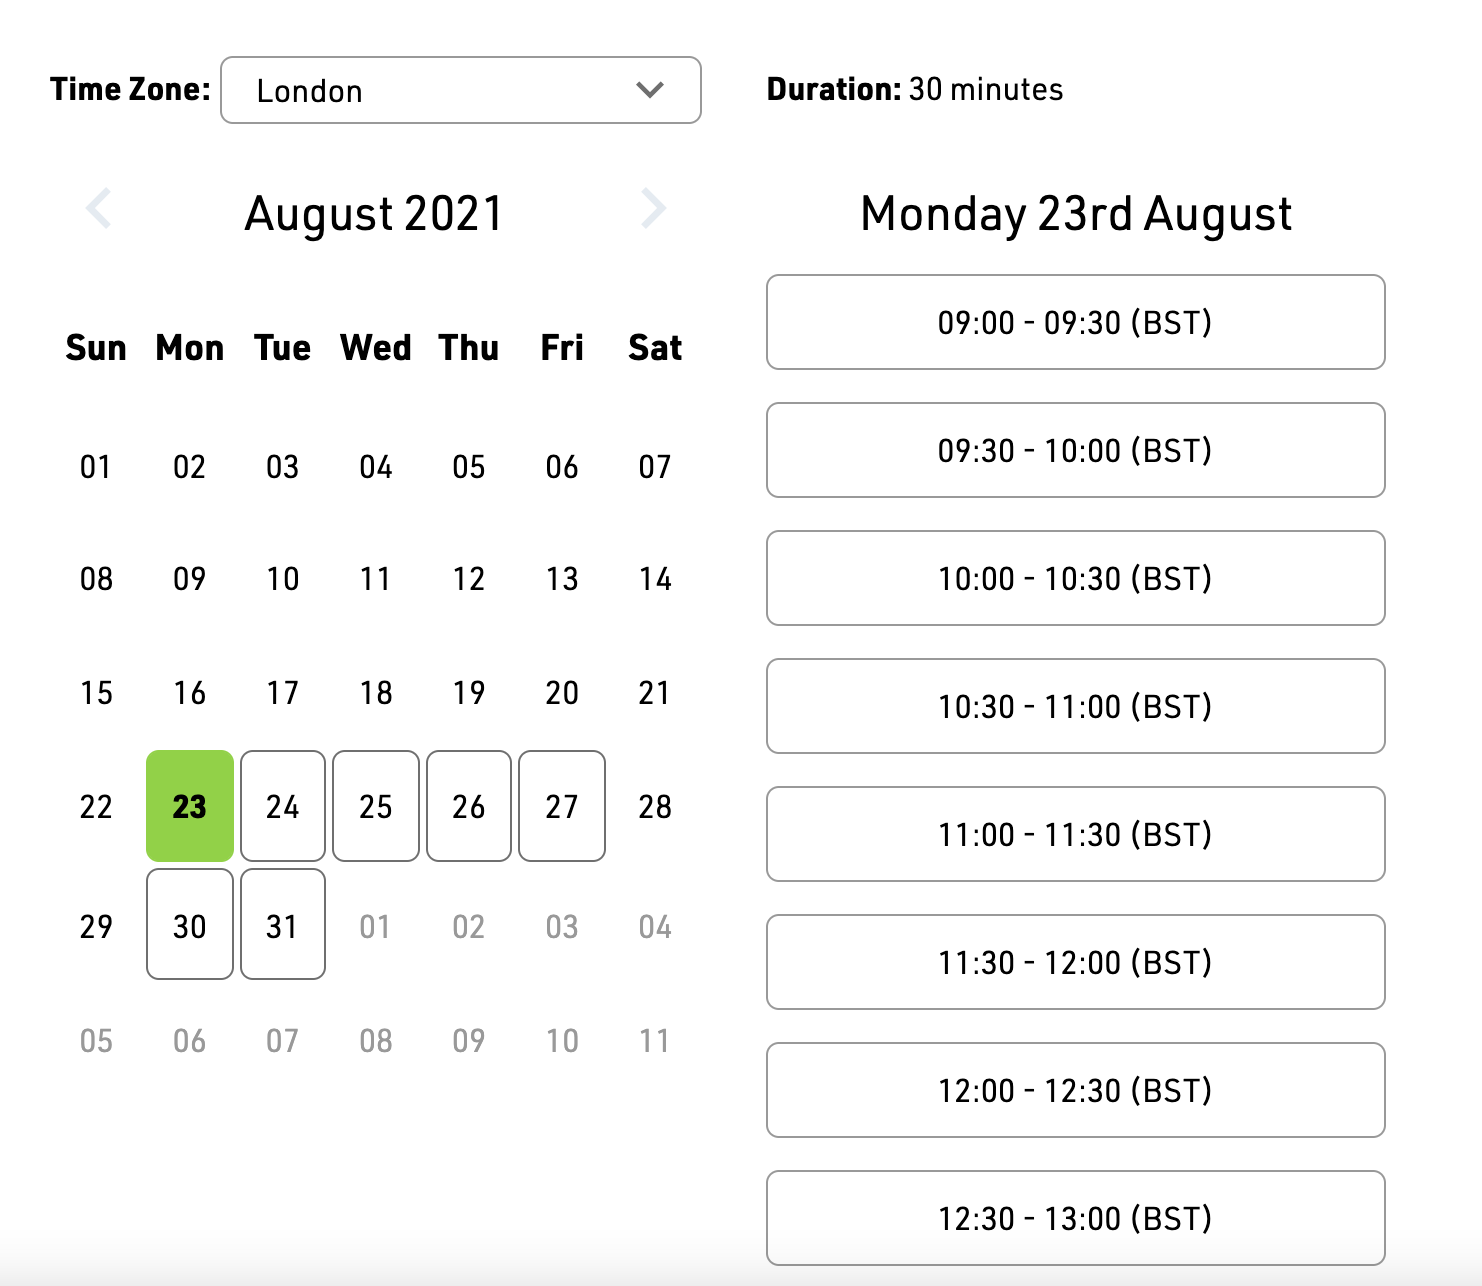
Step 3. View your availability #
For the second page of our application, we want to be able to view our availability for a set period of time, and to be able to select a time slot to create a new event. We can do this with the Date Time Picker UI Element.
Generating a token for the Date Time Picker #
As with the Calendar Sync Element, we will need a new element token to allow the Date Time Picker to access our availability. This process is almost exactly the same as generating a token for the Calendar Sync Element; the only difference is in the “permissions” we need. For the Calendar Sync Element we needed the account_management permission, but for the Date Time Picker we’ll need the availability permission.
In the server.js file, find the "/availability" route for the app:
app.get("/availability", async (req, res) => {
    return res.render("availability", {});
});
And replace it with this:
app.get("/availability", async (req, res) => {
    const token = await cronofyClient.requestElementToken({
        version: "1",
        permissions: ["availability"],
        subs: [process.env.SUB],
        origin: "http://localhost:7070"
    });

    return res.render("availability", {
        element_token: token.element_token.token,
        sub: process.env.SUB,
        data_center: process.env.DATA_CENTER
    });
});
Adding the Date Time Picker into the page #
As with our home page, look for the empty <script> tag toward the bottom of the availability.ejs template, which is where we’ll add our initialization code for the Date Time Picker.
In addition to requiring a different permission-set for the token, for the Date Time Picker to work in this scenario it requires two additional options: an availability_query and a callback. We’ll add these options in stages. For the following code, AVAILABILITY_QUERY and CALLBACK are placeholders that we’ll flesh out in the next steps.
<div class="element__wrapper">
    <div id="cronofy-date-time-picker"></div>
</div>

<script src="https://elements.cronofy.com/js/CronofyElements.v1.67.7.js"></script>
<script>
    CronofyElements.DateTimePicker({
        element_token: "<%= element_token %>",
        data_center: "<%= data_center %>",
        target_id: "cronofy-date-time-picker",
        availability_query: AVAILABILITY_QUERY,
        callback: CALLBACK
    });
</script>
Now we need to construct and availability query and our callback.
Constructing an availability query #
In short the availability_query is an object that matches a valid Cronofy Availability request. This query defines three things:
- The participants that we want to query.
- The required duration of the event we want to book.
- An array of periods to check availability in.
For this application, our participants object can be relatively simple. We only want to check our own availability, so we only need to add our own profile (using the sub of our account):
participants: [
    {
        required: "all",
        members: [
            {
                sub: "<%= sub %>"
            }
        ]
    }
]
The required_duration is set in minutes, and can be either 15, 30, or 60.
query_periods should be an array of objects with a start and end time. Both should be a valid Time data-type, and must represent a future point in time. The end of an available period must also be between 1 minute and 35 days after the earliest start. For example:
query_periods: [
    {
        start: "2026-07-18T09:00:00Z",
        end: "2026-07-18T10:00:00Z"
    },
    {
        start: "2026-07-18T15:00:00Z",
        end: "2026-07-18T17:30:00Z"
    }
]
The Date Time Picker callback #
The Date Time Picker callback is a function to be called when a selected slot is “confirmed” by the user. It receives a notification object with a type of "slot_selected".
For our application, we want to check that the notification represents a "slot_selected" event, and then navigate the browser to the last page in our app. The last page will be where we add the booked event into our calendar, so we’ll need to pass along the selected slot’s details when the last page is loaded. We can do this by adding the slot as a query string. As well as a type, the notification object also contains the slot information that we need.
callback = res => {
    // Check if this is a `slot_selected` notification.
    // If not, we'll return and do nothing.
    if (res.notification.type !== "slot_selected") return;

    // Convert the slot info into a URL-safe string.
    const slot = JSON.stringify(res.notification.slot);

    // Load the last page of our app, with the `slot` in the query string.
    window.location.href = `/submit?slot=${slot}`;
};
The full Date Time Picker initialization #
Putting together the availability query and the callback, the Date Time Picker initialization should look something like this:
const dateTimePickerOptions = {
    element_token: "<%= element_token %>",
    data_center: "<%= data_center %>",
    target_id: "cronofy-date-time-picker",
    availability_query: {
        participants: [
            {
                required: "all",
                members: [
                    { sub: "<%= sub %>" }
                ]
            }
        ],
        required_duration: { minutes: 60 },
        available_periods: [
            { start: "2026-07-18T09:00:00Z", end: "2026-07-18T10:00:00Z" },
            { start: "2026-07-18T15:00:00Z", end: "2026-07-18T17:30:00Z" }
        ]
    },
    callback: res => {
        if (res.notification.type !== "slot_selected") return;

        const slot = JSON.stringify(res.notification.slot);
        window.location.href = `/submit?slot=${slot}`;
    }
};
And the page itself should look like this:
Step 4. Add an event to our calendar #
The last page of our app is where we’ll actually add an event to our calendar. We’re being given the event details in the slot query parameter, so we’ll need to parse that into an object we can use. Because we’re going to be writing to a calendar, we’ll need to add an access_token to our cronofyClient.
const cronofyClient = new Cronofy({
    client_id: process.env.CLIENT_ID,
    client_secret: process.env.CLIENT_SECRET,
    data_center: process.env.DATA_CENTER,
    access_token: process.env.ACCESS_TOKEN
});Formatting an event #
To add an event to a calendar, we’ll need to turn our slot into an object that will match the format required by the Create or Update Event section of the API.
In addition to the start and end that were given to us by the Date Time Picker callback, we’ll need to add a unique event_id, a text summary and description, and the calendar_id of the calendar we want to add the event to.
If you don’t know the calendar_id for your account, you can use the userInfo() method in the SDK, or hit the User Info endpoint directly. This will give you all the necessary information about your account.
Adding the event to the calendar #
With a properly formatted event object, all we need to do to add it to the calendar is submit it using the createEvent() method in the SDK.
For this process to work, the method requires a calendar_id. This is the ID for the specific calendar that the event will be added to. We’ll use the userInfo() method to retrieve your calender_id. You can find more information about access tokens in the Request an Access Token section of the API documentation.
In the server.js file, find the "/submit" route for the app:
app.get("/submit", async (req, res) => {
    return res.render("submit", {});
});
And replace it with this:
app.get("/submit", async (req, res) => {

    // Get the `slot` data from the query string
    const slot = JSON.parse(req.query.slot);

    const userInfo = await cronofyClient.userInfo();
    const calendarId = userInfo["cronofy.data"].profiles[0].profile_calendars[0].calendar_id;

    cronofyClient.createEvent({
        calendar_id: calendarId,
        event_id: "booking_demo_event",
        summary: "Demo meeting",
        description: "The Cronofy developer demo has created this event",
        start: slot.start,
        end: slot.end
    });

    return res.render("submit", {});
});
Find out more detail about adding an event in the API documentation.
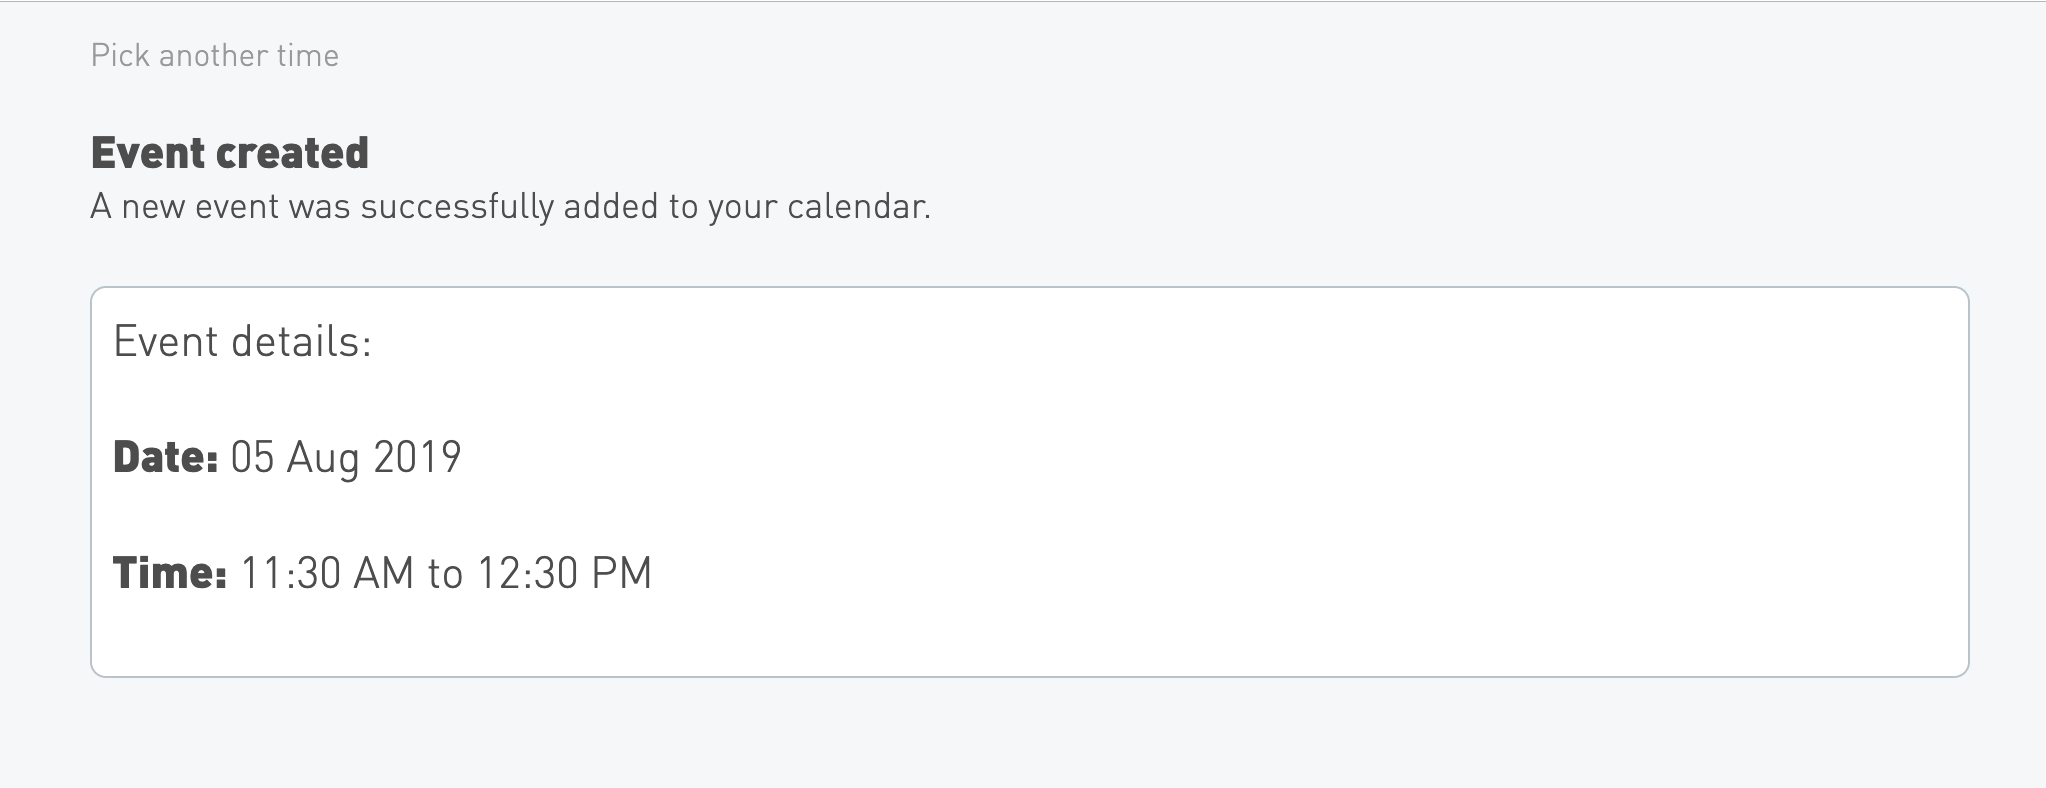
Display a confirmation message to the user #
To complete the application we’ll pass the slot details through to our page template and display a confirmation screen to show the user that the event has been added.
To easily format our date strings, we’ll add Moment.js to our project. To do this we’ll run npm install --save moment (which will install Moment into our node_modules directory) and add const moment = require("moment"); to the top of our server.js file.
With Moment installed, we can format the slot’s date into readable strings that we can then pass into our template.
At the bottom of the "/submit" route in server.js, replace this:
return res.render("submit", {});With this:
const meetingDate = moment(slot.start).format("DD MMM YYYY");
const start = moment(slot.start).format("LT");
const end = moment(slot.end).format("LT");

return res.render("submit", {
    meetingDate,
    start,
    end
});
Which will allow us to display the date, start-time, and end-time in our submit.ejs template:
<div class="block block--border">
    <p>Event details:</p>
    <p><strong>Date:</strong> <%= meetingDate %></p>
    <p><strong>Time:</strong> <%= start %> to <%= end %></p>
</div>
And the full completed page will look like this:
Step 5. Optional extras: set your rules and customization #
Availability Rules #
If all that wasn’t enough to get you excited about using Cronofy to handle scheduling in your application, there’s more! It’s often useful to define periods of time that you don’t want to be available for, but haven’t explicitly blocked-off in your calendar. A common version of this is setting “work hours”: times in the week that you know you’re always unavailable. Cronofy call these Availability Rules.
Update the Element token #
If we return to our home page (where we currently just have the Calendar Sync Element), we can add in another handy UI Element: the Availability Rules Element.
As with the previous two Elements we’ve used, the Availability Rules Element requires a specific permission when creating its token: this time it’s managed_availability. By adding this permission to the existing requestElementToken options and keeping account_management for the Calendar Sync Element, we can use the same token for both of the Elements on the page.
const token = await cronofyClient.requestElementToken({
    version: "1",
    permissions: ["account_management", "managed_availability"],
    subs: [process.env.SUB],
    origin: "http://localhost:7070"
});
Add the Availability Rules Element #
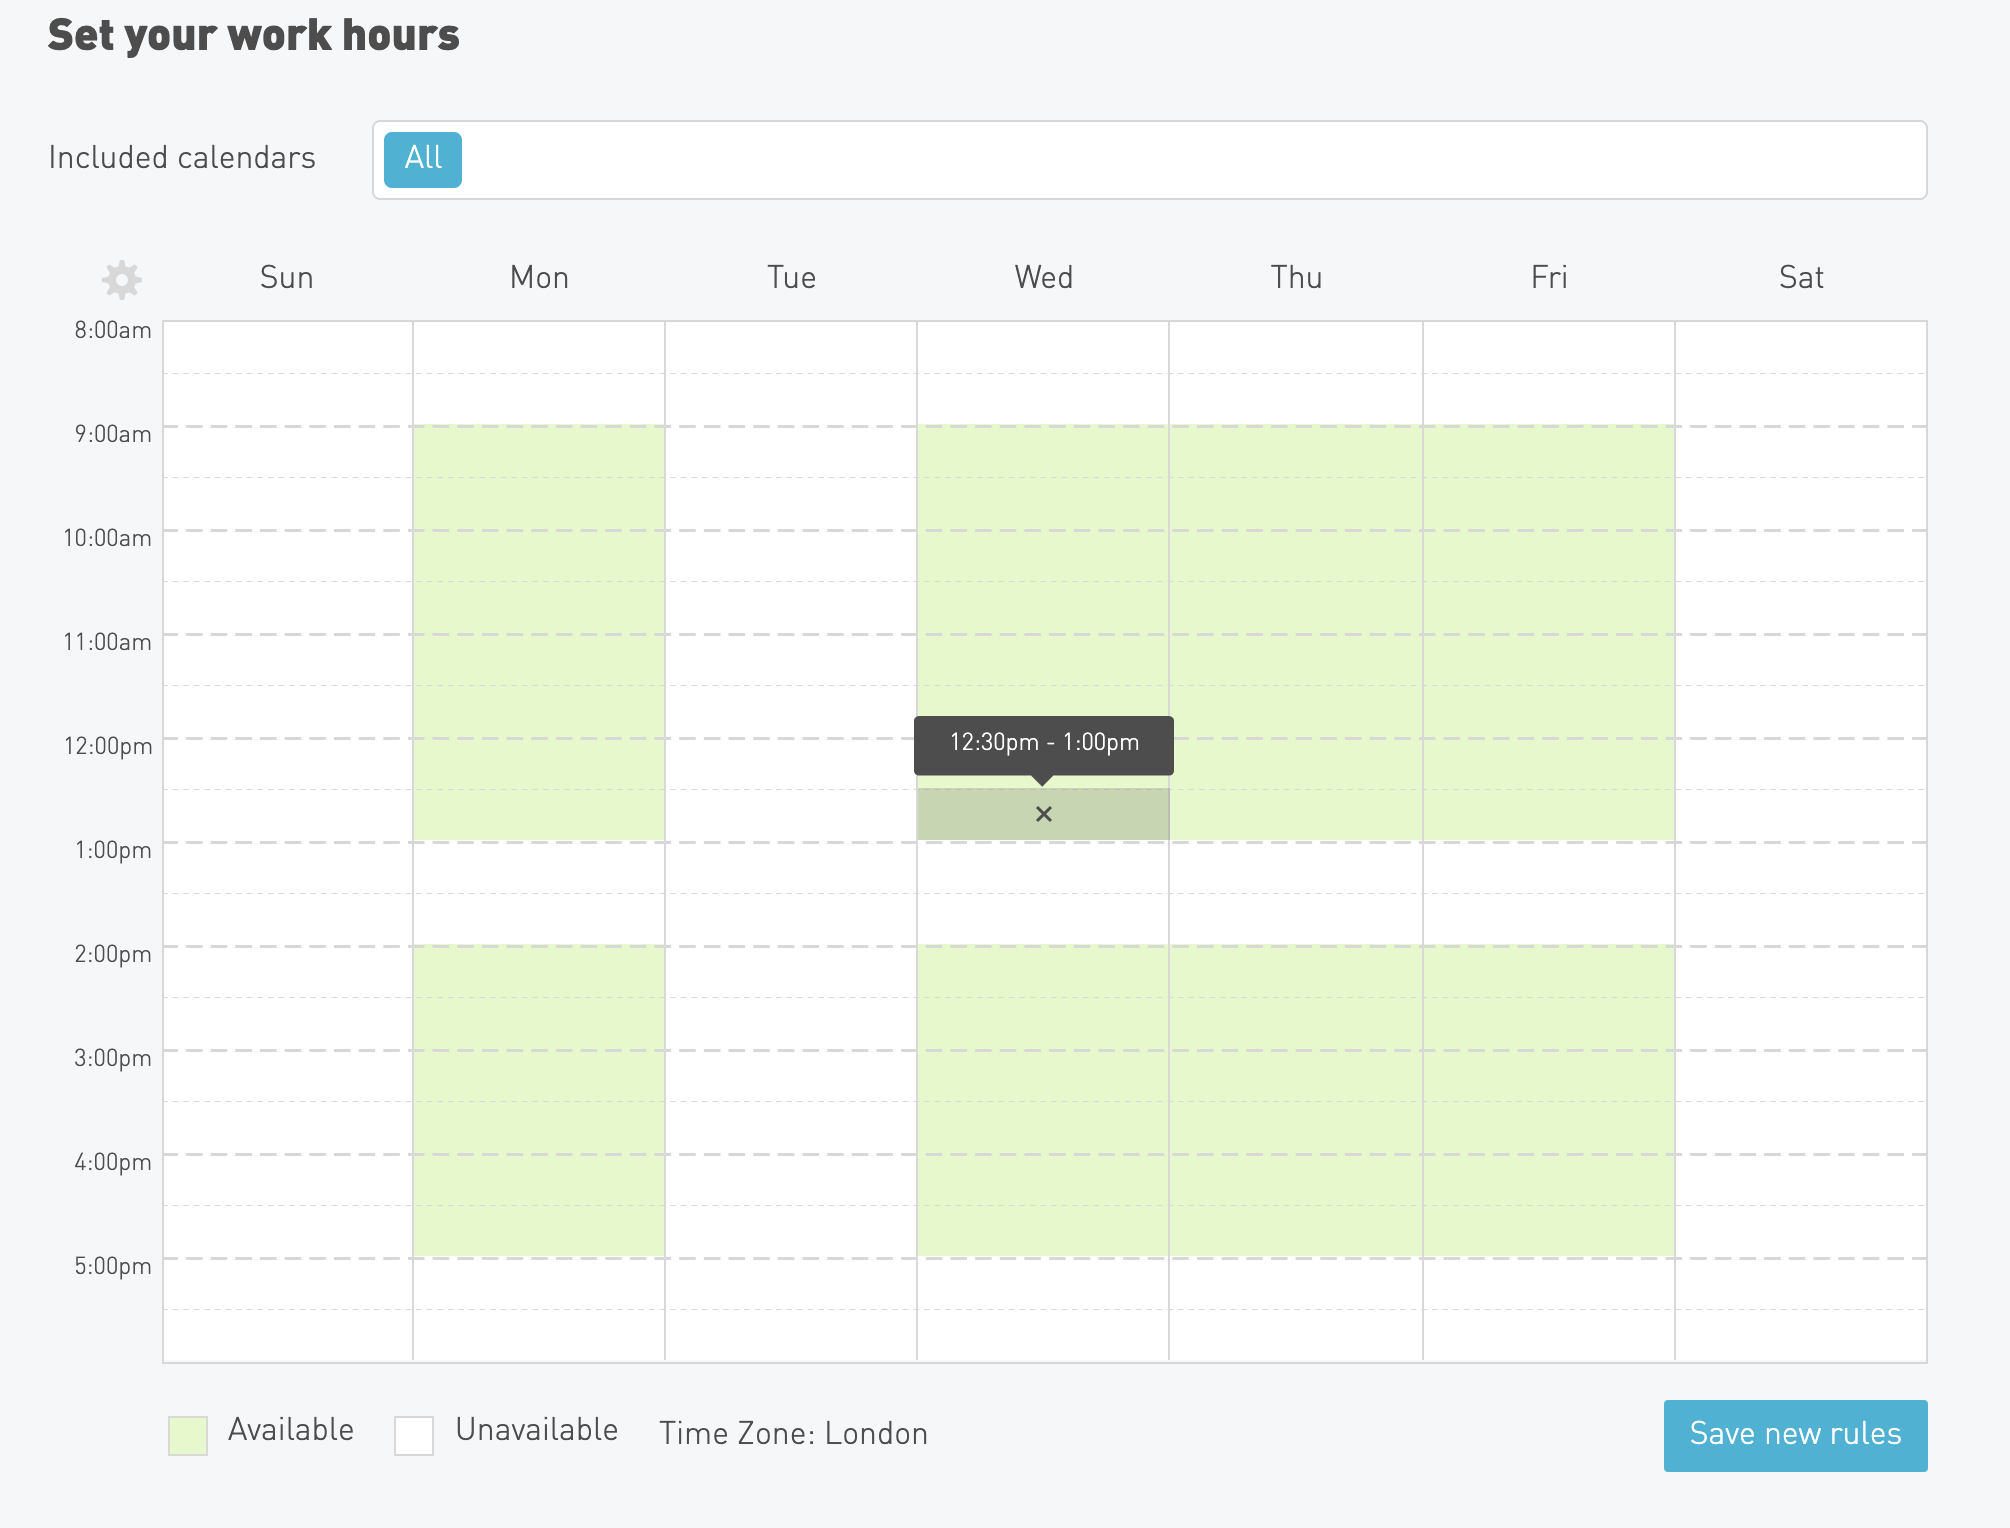
To add the Availability Rules Element into the page, we’ll create another mounting point in the DOM (this time a <div> with an ID of “cronofy-availability-rules”).
<hr>
<h2 class="title-heading">Set your work hours</h2>
<div id="cronofy-availability-rules"></div>
In addition to the mounting-point ID and the token, we’ll need two extra options: the timezone ID and a unique ID for our rule.
The rule’s ID can be anything you like - it’s what we’ll use to apply the rule to the Date Time Picker’s query (in the next step). The timezone ID must be a known time zone identifier from the IANA Time Zone Database. We can use Intl.DateTimeFormat() to deduce the timezone directly from the browser.
// Sniff the browser's timezone
const timezone = Intl.DateTimeFormat().resolvedOptions().timeZone;

CronofyElements.AvailabilityRules({
    element_token: "<%= element_token %>",
    data_center: "<%= data_center %>",
    target_id: "cronofy-availability-rules",
    availability_rule_id: "work_hours",
    tzid: timezone
});
This will display the Availability Rules Element on the page.
Apply the rule to our Date Time Picker #
Rules are not automatically taken into account by availability queries. If we want the rules to apply, we have to explicitly declare them. This means updating the participants portion of the query that we pass into the Date Time Picker initialization.
Specifically, we need to adjust each member that we want to apply rules to. We do this by declaring managed_availability as true.
participants: [
    {
        required: "all",
        members: [
            {
                sub: "<%= sub %>",
                managed_availability: true
            }
        ]
    }
]
Customizing UI Elements #
Now you have the UI Elements set up, you can customize the style of these elements to match your requirements. You can use the preset layouts of the UI Elements, but if you would like to customize these further, you can refer to our Customization guide to see the formatting options and how to set these up.
Now that you’ve experienced the power of the Cronofy API first hand, why not explore further? There’s plenty of information in the rest of the documentation site.
Troubleshooting #
If you encounter unexpected errors at any stage, be sure to check the browser’s console and the command line output.
A common issue is that the access token may have expired, so double check that your access token is fresh. You can do this by clicking ‘add calendar account’ again and reauthorising the account.
For simplicity this demo app does not handle storing and refreshing of access tokens - we recommend using Postman for exploring our API, and have a setup guide for Postman here.
If you face the error message ‘No version set for command npm’, run the below in the terminal to specify the node js version:
asdf local nodejs [insert nodejs version]If you have been following along step-by-step in the starter branch of the GitHub repo, try switching to the master branch which includes the full working code plus some extra error handling that will provide more detailed information in case of failed authentication or token errors.