Push Notifications
Read as Markdown Required plan: EmergingOften called Web Hooks, Push Notifications are how Cronofy keeps your application up to date with changes in real-time.
Polling for changes is a massively wasteful way of frittering compute cycles. With the majority of systems, the vast majority of the time the results are that nothing has changed. Far better then to only do work when something has changed. That is where push notifications come in.
With the Cronofy API you can set up notifications for each user connected to your application for whenever something changes in their calendar. Adding, updating and deleting of events, whether they are the events your app creates or the user created in their calendar, can all be notified.
How Push Notifications Work #
Your app has an HTTP(S) endpoint to receive push notifications.
Using the Cronofy API you create a Notification Channel for an account with the public url of the endpoint on your application.
The Cronofy API calls that endpoint whenever something changes and includes a changes_since time indicating when the changes being alerted relate to.
Your application can query the Read Events endpoint passing the changes_since value as the last_modified parameter.
Your app processes just the events that have changed.
Our full guide on the setup we recommend for keeping your application up-to-date with changes on the end-user’s external calendar side can be found here.
Setting up a notification channel #
Push notifications aren’t enabled for Personal Tokens as they have to be linked to an Application, so the first task is to create an Application in the Developer Dashboard. See the Application Authorization tutorial for a full explanation of Applications and obtaining authorization to access a user’s calendars.
Once you have an application, create a Notification Channel. There are no restrictions on the URL here so you can have an individual URL for each user in your application.
https://example.com/cronofy/channel/{your user id}
https://example.com/cronofy?user_id={your user id}
Whatever suits your application.
Receiving notifications #
Your endpoint will receive something similar to the following when any calendar changes are detected.
POST {CALLBACK_URL_PATH} HTTP/1.1
Host: {CALLBACK_URL_HOST}
Content-Type: application/json; charset=utf-8

{
  "notification": {
    "type": "change",
    "changes_since": "2026-07-29T09:24:16Z"
  },
  "channel": {
    "channel_id": "chn_54cf7c7cb4ad4c1027000001",
    "callback_url": "{CALLBACK_URL}",
    "filters": {}
  }
}
Your app can then query the Read Events or Free Busy end-points to get the latest changes using the changes_since value as the last_modified query parameter.
As long as your application responds with an HTTP status code in the 2xx range within 5 seconds, the Cronofy API will consider the push notification successful.
If it takes longer than 5 seconds to respond, or responds with a code not in the 2xx range will be treated as if it has failed.
We will continue to attempt to send the push notification for 24 hours. If no notifications succeed during this period then it is assumed that the channel is no longer valid and so the channel will be closed automatically and no further push notifications will be sent.
This is the point where queuing received notifications for later processing can be really advantageous.
Testing locally #
Ngrok is your friend when it comes to testing your push notification endpoint. This downloadable software allows you to expose a local server behind a NAT or firewall to the internet.
First step once you’ve downloaded it is to set up the tunnel to your local application. For example this would set up an http tunnel to the default rails server port on your local machine.
ngrok http localhost:3000
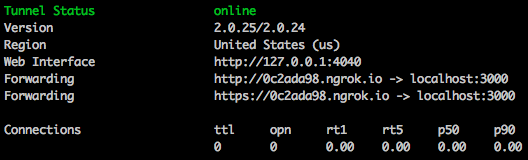
You’ll be shown a console with the details of the public URL. For instance, in this example you can use https://0c2ada98.ngrok.io as the root url for your channels.
Then create a channel for your account with that URL and the path to your web hook and you can test against Cronofy API live but on your local machine.
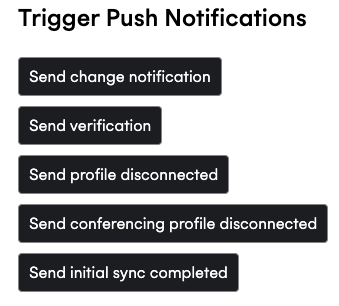
You can make use of the test buttons in our developer dashboard to test receiving notifications on your new channel. If you go to your Cronofy application dashboard and click the Channels option on the left, you should be able to see all notification channels for that application along with an indicator as to their current status. If you select an Active channel, you’ll see a set of buttons under the Trigger Push Notifications heading, allowing you to prompt us into sending a dummy version of the notification to that channel’s URL.
See our Push Notifications API reference for an outline of all notification types.
Another awesome feature of ngrok is the web console that allows you to inspect traffic and replay if necessary. You’ll find it at http://127.0.0.1:4040.
For more advanced options it’s worth reading the ngrok docs.
Using In Production #
When sending a Push Notification, the certificates provided by your application are verified. Common issues, such as self-signed certificates or partial certificate trust chains, will prevent the connection from being established and no Push Notifications will be sent.
You can check your current SSL certificate rating by testing your callback URL with the SSLLabs SSL Test. A grade of “A” is required for Cronofy to be able to send Push Notifications.
This is a quick introduction to Push Notifications. If you have any further questions please send us an email at support@cronofy.com or go to this page for more information about utilising this feature.